Showing posts with label C. Show all posts
Showing posts with label C. Show all posts
Tuesday, October 6, 2015
New tutorial series about Minix 3.1.8
Hello everyone!
As you might not know, I live in Portugal and I am studying computer engineering at FEUP, in Oporto.
I'm currently taking a course called Computer Labs. To sum it up: we start with an image of a Linux micro kernel called Minix. We run it through VMPlayer on Ubuntu.
From there we mess with registers and program the basics for all the devices from scratch: graphics card, timer, keyboard, mouse, rtc, uart. We must program them in interrupt or polling mode.
If you are wondering if that is easy: well it depends. Most of the times, we rage quit. Other than that, once you get how things work (on the lab before the last one), things should start to make sense?
All this to announce a new series of tutorials, where I'll explain how to set up the virtual machine, how to use Eclipse to code stuff via Remote System Explorer, basic Minix commands and how to do... stuff!
The course is near the end and my final project is almost done. It looks good I must say!
So yeah, this series will be useful for me because I'll get to review every detail from the very start. I'll record my progress so I can check it in the future if I need to.
Actually, I think this series will be of great value for future students who need to take the course or a similar one, and for my friends who didn't quite understand things properly at first and will have to take the course again next year.
Whichever the case is: good luck!
I'll start the series soon!
Read more »
As you might not know, I live in Portugal and I am studying computer engineering at FEUP, in Oporto.
I'm currently taking a course called Computer Labs. To sum it up: we start with an image of a Linux micro kernel called Minix. We run it through VMPlayer on Ubuntu.
From there we mess with registers and program the basics for all the devices from scratch: graphics card, timer, keyboard, mouse, rtc, uart. We must program them in interrupt or polling mode.
If you are wondering if that is easy: well it depends. Most of the times, we rage quit. Other than that, once you get how things work (on the lab before the last one), things should start to make sense?
All this to announce a new series of tutorials, where I'll explain how to set up the virtual machine, how to use Eclipse to code stuff via Remote System Explorer, basic Minix commands and how to do... stuff!
The course is near the end and my final project is almost done. It looks good I must say!
So yeah, this series will be useful for me because I'll get to review every detail from the very start. I'll record my progress so I can check it in the future if I need to.
Actually, I think this series will be of great value for future students who need to take the course or a similar one, and for my friends who didn't quite understand things properly at first and will have to take the course again next year.
Whichever the case is: good luck!
I'll start the series soon!
Back to index
Click here to go back to the index post.
[Minix] Posts index
Minix
Final result preview
I thought it would be appropriate to have a preview of the final result of the project covered in these tutorial series in it's index, so here it is:Table of contents
IntroductionYou can actually skip this and head to the first tutorial right away.
Tutorial 1
How to install Minix and setup VMware Player
Tutorial 2
RSE and Minix commands
Tutorial 3
Setting up a project with some useful scripts
Tutorial 4
Adding graphics to a project
Tutorial 5
Adding keyboard input to a project
Tutorial 6
Adding a timer to a project
Tutorial 7
Adding a mouse to a project
Tutorial 8
Loading bmp images
Tutorial 9
Creating a state machine and a main menu
Tutorial 10
Creating the game state, adding a moving background and ground
Tutorial 11
Adding flappy and the mario pipes
Main menu screenshot

[Minix][Tutorial 4] Adding graphics to a project
In this tutorial we are actually going to start coding flappy-nix.
You should have two files. I named mine Graphics.c and Graphics.h. As you might know, the .h file is where the functions are declared, where as in the .c the functions are actually defined.
You should have implemented the VESA BIOS Extensions during class as well. I implemented them in VBE.c and VBE.h.
You should also have a file named LmLib.h, which is provided in the class handout.
In addition to these, in every project I work, I usually define a Utilities.c and Utilities.h where I define some useful functions. Below is a screenshot of my Utilities current state, where is also visible the current content of the src folder. You should have all these files in there by now.
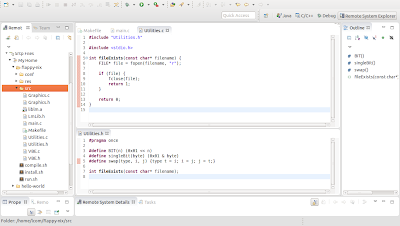
In this case, as you can see, I only defined three macros and a function to verify a file's existence. Pay special attention to these macros: you will find them really handy throughout LCOM. If you don't know what a macro is or do not understand what these specific macros are for, I strongly advice you to do a research on google for yourself.
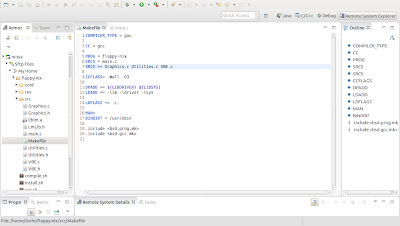
Below is my current Makefile. Notice that the new files have been declared at line 7.
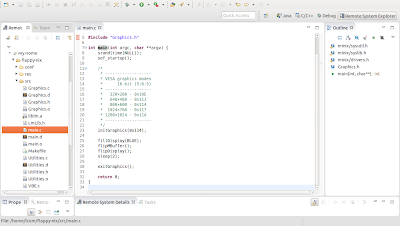
You might be asking: What are all those functions? Where is fillDisplay() defined? Where is BLUE defined?
These are all functions I have developed. You might have developed functions which do almost the same thing but have different names. I will now give you some advice about them.
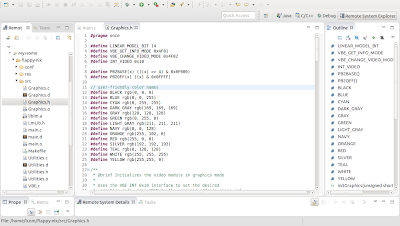
As you can see, I have color names! And they are VERY useful. I defined them in Graphics.h as preprocessor directives - look at the screenshot below. This is a nice way to easily access and pass colors to functions! It is a good idea for you to have them. You should notice though that they make use of the rgb() function, which you should implement.
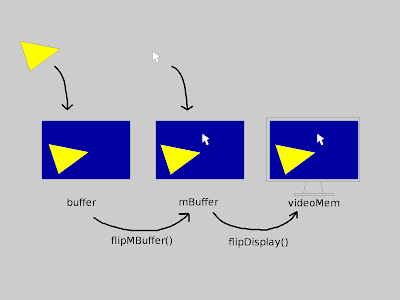
Here is how all it works: every graphics function I have defined writes to the buffer. So, say I call drawRectangle(), the function will modify the buffer. Everything except for the mouse is written there: when I call drawMouse(), that function copies the buffer to mBuffer and only then draws the mouse cursor directly in mBuffer. This enables me to update the mouse more frequently, because in order to draw the mouse cursor, I do not need to redraw every polygon of the entire scene, as long as the objects in the scene have not changed! I just copy the buffer to mBuffer again and draw the mouse cursor directly there. Do you get it? This way we can update the mouse more frequently and as a consequence, the mouse cursor movement will look much more fluid. After that, whenever I want to update the display with what has been written to the mBuffer, I just need to call flipDisplay(), which will copy the mBuffer to the video memory - the screen buffer, where we actually see the graphics.
Below is a draft with the logic behind all this.
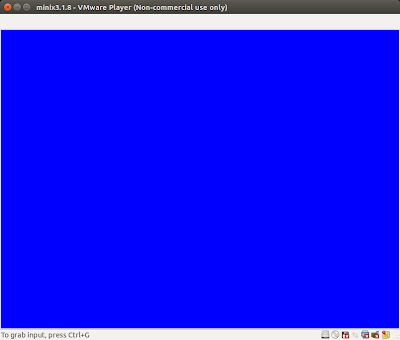
And this should be the result: a blue screen lasting two seconds.
Read more »
Important note
My goal with these tutorials is to help you and guide you through the development of a project and to give you advice and tips for the LCOM course. These guides ARE NOT a way for you to just easily skip the course. Therefore, I will demonstrate how to develop this project from scratch but I will not show you how to code the stuff you are supposed to do in class. Things like developing basic functions to write to the video memory, handle the timer, handle mouse clicks and keyboard presses are expected from you, and I will make use of these abstractions without showing you their source code.Adding graphics
The first thing we are going to do is to add some graphics to our program! I will take into account that you already have developed your own graphics library during class.You should have two files. I named mine Graphics.c and Graphics.h. As you might know, the .h file is where the functions are declared, where as in the .c the functions are actually defined.
You should have implemented the VESA BIOS Extensions during class as well. I implemented them in VBE.c and VBE.h.
You should also have a file named LmLib.h, which is provided in the class handout.
In addition to these, in every project I work, I usually define a Utilities.c and Utilities.h where I define some useful functions. Below is a screenshot of my Utilities current state, where is also visible the current content of the src folder. You should have all these files in there by now.

In this case, as you can see, I only defined three macros and a function to verify a file's existence. Pay special attention to these macros: you will find them really handy throughout LCOM. If you don't know what a macro is or do not understand what these specific macros are for, I strongly advice you to do a research on google for yourself.
Update Makefile
Do not forget to constantly update your Makefile: since we've added a lot of files to the src folder, you should declare the .c files after the SRCS label, otherwise the compiler will not know of their existence at compile time.Below is my current Makefile. Notice that the new files have been declared at line 7.

Update main.c
Now that we have everything set, let's update main.c to make the program fill the display with the color blue for two seconds and then terminate. Here is how my main.c looks like:
You might be asking: What are all those functions? Where is fillDisplay() defined? Where is BLUE defined?
These are all functions I have developed. You might have developed functions which do almost the same thing but have different names. I will now give you some advice about them.
As you can see, I have color names! And they are VERY useful. I defined them in Graphics.h as preprocessor directives - look at the screenshot below. This is a nice way to easily access and pass colors to functions! It is a good idea for you to have them. You should notice though that they make use of the rgb() function, which you should implement.

The mouse buffer
I have also implemented two functions called flipMBuffer() and flipDisplay(). What are they used for? Well, it is something similar to a triple-buffer: I have three buffers: videoMem, mBuffer and buffer - flipMBuffer stands for flip mouse buffer and mBuffer stands for mouse buffer.Here is how all it works: every graphics function I have defined writes to the buffer. So, say I call drawRectangle(), the function will modify the buffer. Everything except for the mouse is written there: when I call drawMouse(), that function copies the buffer to mBuffer and only then draws the mouse cursor directly in mBuffer. This enables me to update the mouse more frequently, because in order to draw the mouse cursor, I do not need to redraw every polygon of the entire scene, as long as the objects in the scene have not changed! I just copy the buffer to mBuffer again and draw the mouse cursor directly there. Do you get it? This way we can update the mouse more frequently and as a consequence, the mouse cursor movement will look much more fluid. After that, whenever I want to update the display with what has been written to the mBuffer, I just need to call flipDisplay(), which will copy the mBuffer to the video memory - the screen buffer, where we actually see the graphics.
Below is a draft with the logic behind all this.

Testing the program so far
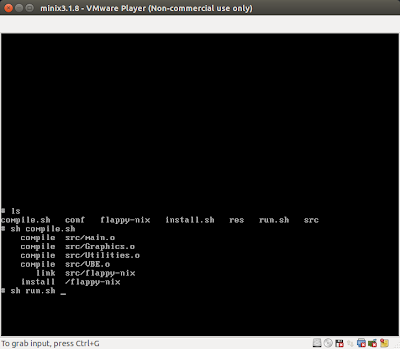
To test the program, go to minix, browse to the project folder, compile the program and run it. There is no need to run sh install.sh again because we've already run it once; it is only necessary to run it again when we make changes to the res folder.
And this should be the result: a blue screen lasting two seconds.

Back to index
Click here to go back to the index post.[Minix][Tutorial 2] RSE and Minix commands
In this tutorial I will teach you how to link Eclipse with Minix through RSE and the infamous Hello world program.
RSE, also known as Remote System Explorer, is a plug-in for eclipse which will be essential to develop Minix applications.
First of all, open Eclipse and boot Minix.
Log in minix. If you did not catch this in the previous tutorial, both the username and password are lcom.
In eclipse, open the Remote System Explorer perspective.
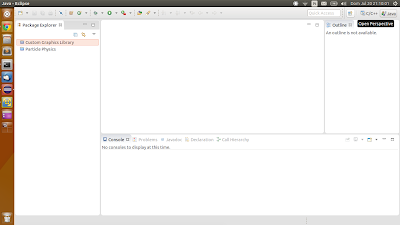
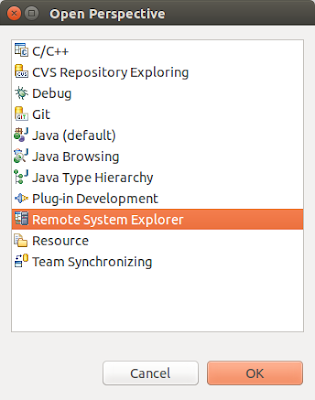
If RSE is not on the list, you will need to install it:
We now have the RSE perspective up and running, but we still have to configure the connection to Minix.
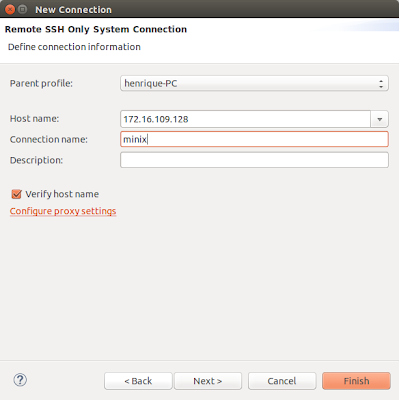
Click the button to add a new connection:
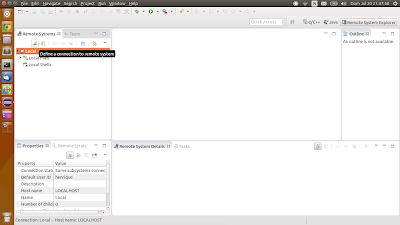
Select SSH Only and press Next.
Now you need to get the ip of your virtual machine. Just check it out in VMware:
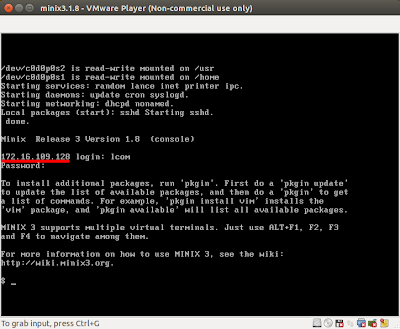
Type that ip into the Host Name box, name the connection as minix and press Finish.
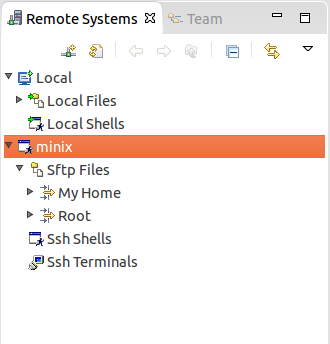
The minix connection should now appear on the list of Remote Systems:
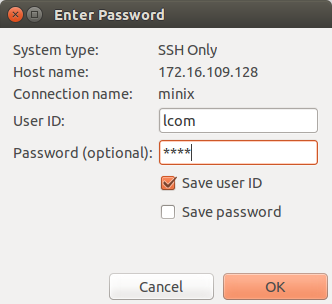
If you try to open My Home, you will be prompted to enter a password. Again, use lcom for both User ID and Password and press OK:
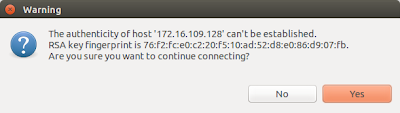
Since it is the first time we are opening the connection, some messages will pop up...
Just press Yes, Yes, Yes and Ok.
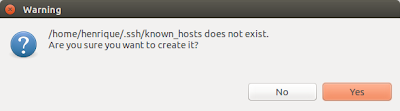

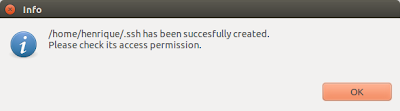
Now that we have everything set, let's create our first program via RSE!
Right-click My Home > New > Folder and name it hello-world.
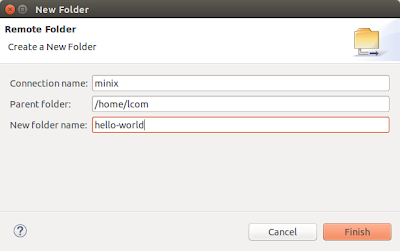
Right-click hello-world > New > File and name it main.c.
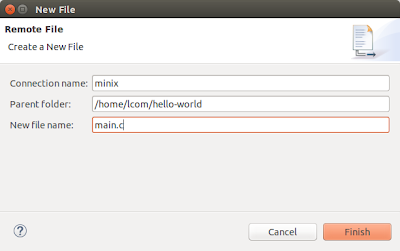
You should end up with:
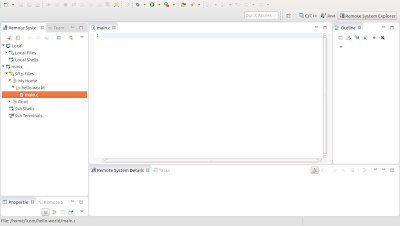
So, what we've done so far was to create a folder and a file inside it using RSE. Let's switch to VMware and see if the folder is really there.
Right after logging in, type ls and press Enter. This command lists the content of the current folder we're in. If you did everything correctly so far, there should be a folder called hello-world!
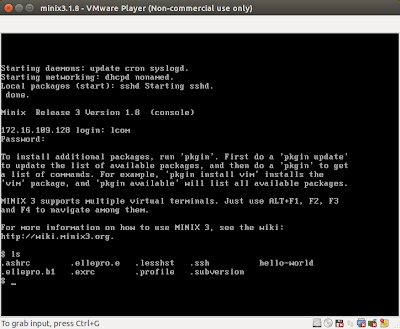
Now, let's navigate to hello-world and check it's content.
To navigate to another folder, use the command cd destiny-folder. So in our case, just type: cd hello-world. If you now list the current folder's content using ls, the result should look like this:
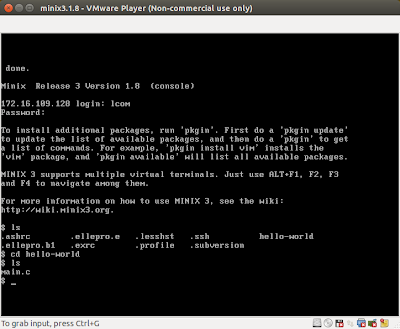
I really hope you are getting the hang of this and hopefully everything is making sense.
Let me teach you a little trick that is REALLY useful.
First, navigate to the folder that contains hello-world, in other words, go up in the folders tree using the command "cd ..".
Just to make sure we're where we wanted, type ls. The result should be:
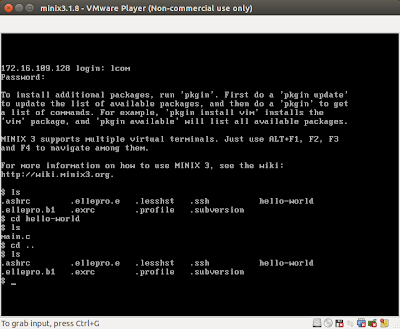
The trick I wanted to show you is the auto-completion. Trust me, it is VERY useful.
I want you to navigate to the hello-world folder again, remember the command? Yes, it is cd hello-world. BUT DON'T TYPE IT JUST YET! I want you to type cd h and afterwards to press Tab on your keyboard. Hopefully, after pressing tab, the command auto-completed to ch hello-world/.
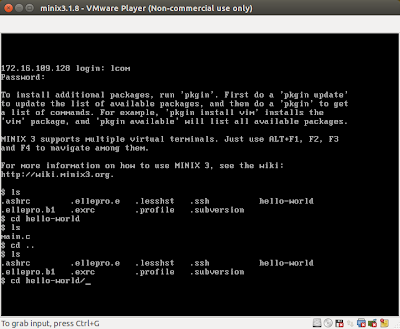
And that's it, try not to forget this and use it whenever you can, since it makes browsing through folders blazing fast and you will never misspell a folder again.
The auto-complete also works with files. You must notice though that when you have more than one folder starting with the same letter, the auto-complete will not work and you must provide an additional letter until the prefix on the command only matches to one folder.
Time to switch to Eclipse.
Open main.c and write a simple hello world program:
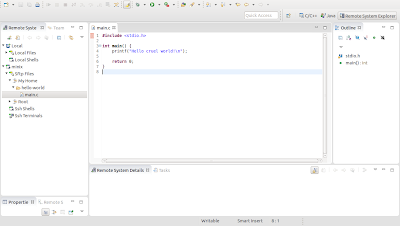
Save main.c and switch to Minix.
You can type the command clear to clear the minix console.
You should still be inside hello-world folder, so the output of ls should currently only be main.c.
We now want to compile main.c to create an executable file.
The command goes like: gcc -Wall main.c -o hello
The output of ls should now consist of two files: main.c and hello, the latter being the result of the compilation of main.c.
Well, what are we waiting for?! Let's run it! Type: ./hello and the result should look like this:
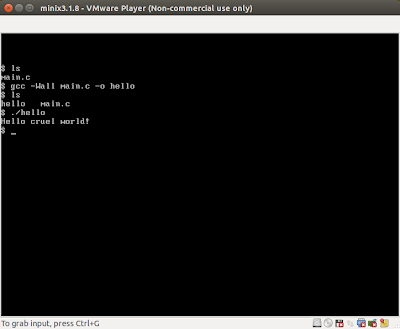
And there is the expected output: Hello cruel world!
I guess this is enough for one tutorial!
Let's just turn off the virtual machine and review this tutorial's commands.
To turn off minix, type shutdown. Wait for it to work, and then type off.
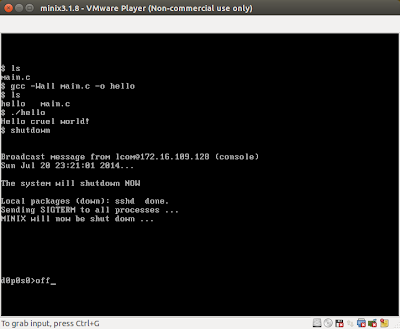
Minix should have turned off as well as VMware.
lists the content of the current folder
cd destiny-folder
navigates to the specified folder
cd ..
navigates up (in other words, to the folder containing the current folder)
clear
clears the console
gcc -Wall file.c -o result
compiles file.c to an executable named result
-Wall is a compile flag that activates the output of all the existing warnings on our program during compilation. For LCOM evaluation purposes, this flag must be active and no errors/warnings are admitted on the compilation output.
./executable-file
runs executable-file
shutdown
turns off minix
off
completely turns off minix and closes VMware
Read more »
RSE, also known as Remote System Explorer, is a plug-in for eclipse which will be essential to develop Minix applications.
First of all, open Eclipse and boot Minix.
Log in minix. If you did not catch this in the previous tutorial, both the username and password are lcom.

In eclipse, open the Remote System Explorer perspective.


If RSE is not on the list, you will need to install it:
- go to Help > Install New Software;
- paste the url of the repository of your eclipse version. In my case it is:
http://download.eclipse.org/releases/luna/
- type "remote" in the filter
- select Remote System Explorer End-User Runtime
- click next, I agree and finish

We now have the RSE perspective up and running, but we still have to configure the connection to Minix.
Click the button to add a new connection:

Select SSH Only and press Next.
Now you need to get the ip of your virtual machine. Just check it out in VMware:

Type that ip into the Host Name box, name the connection as minix and press Finish.

The minix connection should now appear on the list of Remote Systems:

If you try to open My Home, you will be prompted to enter a password. Again, use lcom for both User ID and Password and press OK:

Since it is the first time we are opening the connection, some messages will pop up...
Just press Yes, Yes, Yes and Ok.


Now that we have everything set, let's create our first program via RSE!
Right-click My Home > New > Folder and name it hello-world.

Right-click hello-world > New > File and name it main.c.

You should end up with:

So, what we've done so far was to create a folder and a file inside it using RSE. Let's switch to VMware and see if the folder is really there.
Right after logging in, type ls and press Enter. This command lists the content of the current folder we're in. If you did everything correctly so far, there should be a folder called hello-world!

Now, let's navigate to hello-world and check it's content.
To navigate to another folder, use the command cd destiny-folder. So in our case, just type: cd hello-world. If you now list the current folder's content using ls, the result should look like this:

I really hope you are getting the hang of this and hopefully everything is making sense.
Let me teach you a little trick that is REALLY useful.
First, navigate to the folder that contains hello-world, in other words, go up in the folders tree using the command "cd ..".
Just to make sure we're where we wanted, type ls. The result should be:

The trick I wanted to show you is the auto-completion. Trust me, it is VERY useful.
I want you to navigate to the hello-world folder again, remember the command? Yes, it is cd hello-world. BUT DON'T TYPE IT JUST YET! I want you to type cd h and afterwards to press Tab on your keyboard. Hopefully, after pressing tab, the command auto-completed to ch hello-world/.

And that's it, try not to forget this and use it whenever you can, since it makes browsing through folders blazing fast and you will never misspell a folder again.
The auto-complete also works with files. You must notice though that when you have more than one folder starting with the same letter, the auto-complete will not work and you must provide an additional letter until the prefix on the command only matches to one folder.
Time to switch to Eclipse.
Open main.c and write a simple hello world program:
#include <stdio.h>

int main() {
    printf("Hello cruel world!\n");

    return 0;
}

Save main.c and switch to Minix.
You can type the command clear to clear the minix console.
You should still be inside hello-world folder, so the output of ls should currently only be main.c.
We now want to compile main.c to create an executable file.
The command goes like: gcc -Wall main.c -o hello
The output of ls should now consist of two files: main.c and hello, the latter being the result of the compilation of main.c.
Well, what are we waiting for?! Let's run it! Type: ./hello and the result should look like this:

And there is the expected output: Hello cruel world!
I guess this is enough for one tutorial!
Let's just turn off the virtual machine and review this tutorial's commands.
To turn off minix, type shutdown. Wait for it to work, and then type off.

Minix should have turned off as well as VMware.
Commands used on this tutorial:
lslists the content of the current folder
cd destiny-folder
navigates to the specified folder
cd ..
navigates up (in other words, to the folder containing the current folder)
clear
clears the console
gcc -Wall file.c -o result
compiles file.c to an executable named result
-Wall is a compile flag that activates the output of all the existing warnings on our program during compilation. For LCOM evaluation purposes, this flag must be active and no errors/warnings are admitted on the compilation output.
./executable-file
runs executable-file
shutdown
turns off minix
off
completely turns off minix and closes VMware
Back to index
Click here to go back to the index post.[Minix][Tutorial 6] Adding a timer to a project
In this tutorial we will be adding a timer implementation to our project and making a rectangle move across the screen.

Now we need to declare that FlappyNix has a timer. I have added lines 3, 7 and 11 to FlappyNix.h:

We will have to modify the methods of FlappyNix.
To start, I have added line 8: a const int represnting the mouse update FPS multiplier. What is that? It is an integer that multiplied by the FPS will determine the refresh rate of the mouse. Since FPS = 25 and mouseFPSmult = 3, the mouse position will be tracked at 25 * 3 = 75 FPS.
Regarding the start function, I have added lines 15, 18 and 23, which are responsible for subscribing timer interruptions, resetting the timer frequency and creating a new timer, respectively.

Regarding the update function, I have added line 32, which at every update, before registering any interruption, resets the timer tick flag.

Afterwards, from line 44 to 46, I check for a timer interruption and if there is one, I activate the timer->ticked flag and increment the timer counter - yes, that is exactly what the timerHandler() function does:
Moving on, I have not modified the draw function. I did modify the stop function though: I have added a call to unsubscribe the timer and to delete it afterwards, as you can see below.

Now is a good time to confirm the program is still able to run without any problems. Compile and run it. So far, although we have added a couple of lines, the program should do exactly the same: show a blue screen and terminate when the Esc key is pressed.
Is it still working? Good! Let's move on.

Now we need to initialize this variable! Let's make the rectangle start at x = 10 (line 21).

Let's edit the update function and make the x location of the rectangle increment every time - line 67.

Finally, let's draw a rectangle that starts at flappy->tempRecX with constant width and height of 200 pixels - line 77.

Side note: my drawFilledRectangle() function might be different from yours. If you don't understand mine, here is a quick explanation: it receives five arguments - the first two arguments are the x and y coordinates of the top left corner of the rectangle; the second two arguments are the x and y coordinates of the bottom right corner of the rectangle; the last argument is the color of the rectangle.
And that is it! Compile and run your program and you should see a rectangle moving to the right at constant speed! You should still be able to exit the program by pressing the Esc key on the keyboard. Pretty nice, right?

Read more »
Adding the timer
Go ahead and add the timer implementation you have developed during class as well as i8254.h to the src folder. Do not forget to declare it in the Makefile.
Now we need to declare that FlappyNix has a timer. I have added lines 3, 7 and 11 to FlappyNix.h:

We will have to modify the methods of FlappyNix.
To start, I have added line 8: a const int represnting the mouse update FPS multiplier. What is that? It is an integer that multiplied by the FPS will determine the refresh rate of the mouse. Since FPS = 25 and mouseFPSmult = 3, the mouse position will be tracked at 25 * 3 = 75 FPS.
Regarding the start function, I have added lines 15, 18 and 23, which are responsible for subscribing timer interruptions, resetting the timer frequency and creating a new timer, respectively.

Regarding the update function, I have added line 32, which at every update, before registering any interruption, resets the timer tick flag.

Afterwards, from line 44 to 46, I check for a timer interruption and if there is one, I activate the timer->ticked flag and increment the timer counter - yes, that is exactly what the timerHandler() function does:
void timerHandler(Timer* timer) {I have also added lines 58 to 67. Line 60 is where the mouse draw function call will be placed when we implement the mouse - 75 FPS. Inside this block, there is another block (lines 62 to 66) which is executed at 25 FPS. This block is where we are going to update our moving rectangle, but we will get there... Let's focus on planning the program's structure first.
timer->counter++;
timer->ticked = 1;
}
Moving on, I have not modified the draw function. I did modify the stop function though: I have added a call to unsubscribe the timer and to delete it afterwards, as you can see below.

Now is a good time to confirm the program is still able to run without any problems. Compile and run it. So far, although we have added a couple of lines, the program should do exactly the same: show a blue screen and terminate when the Esc key is pressed.
Is it still working? Good! Let's move on.
Making a rectangle move
Let's do some interesting stuff: draw a rectangle and make it move horizontally to the right. In order to do this, we will need a variable to save the location of the rectangle - line 13.
Now we need to initialize this variable! Let's make the rectangle start at x = 10 (line 21).

Let's edit the update function and make the x location of the rectangle increment every time - line 67.

Finally, let's draw a rectangle that starts at flappy->tempRecX with constant width and height of 200 pixels - line 77.
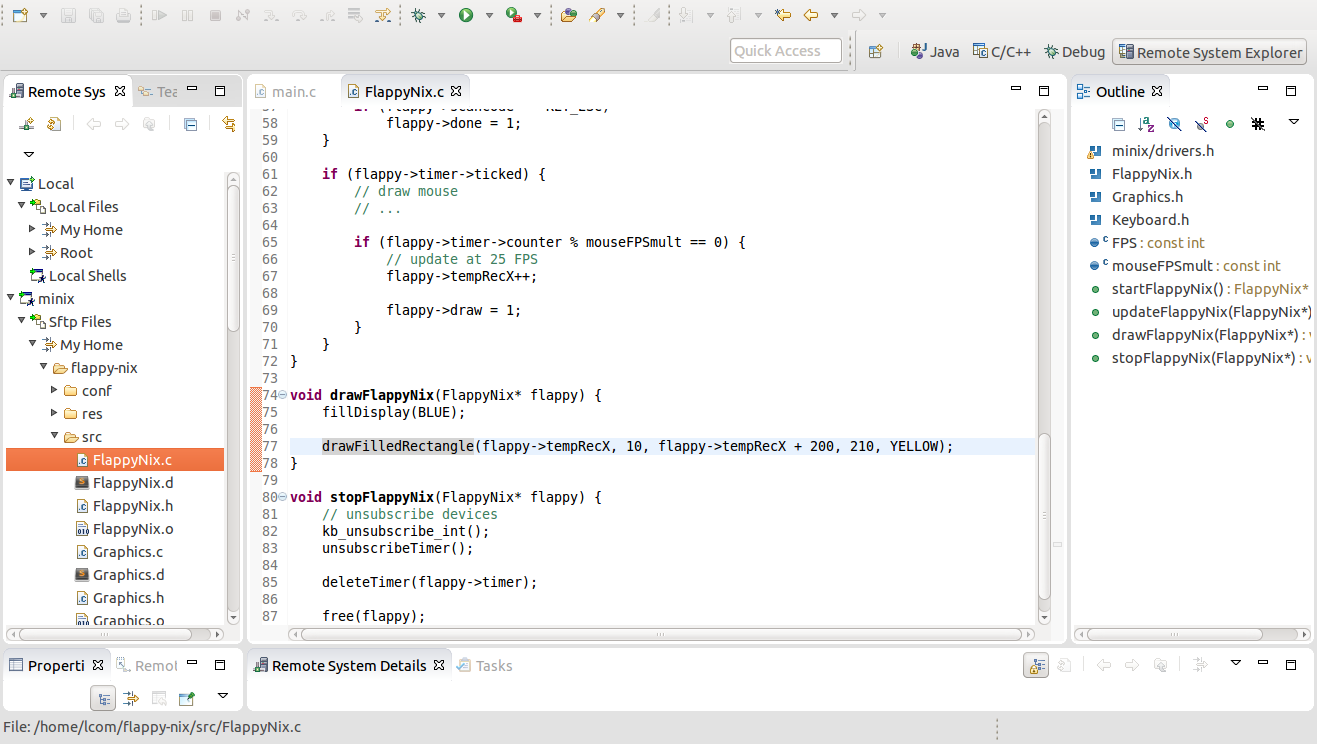
Side note: my drawFilledRectangle() function might be different from yours. If you don't understand mine, here is a quick explanation: it receives five arguments - the first two arguments are the x and y coordinates of the top left corner of the rectangle; the second two arguments are the x and y coordinates of the bottom right corner of the rectangle; the last argument is the color of the rectangle.
And that is it! Compile and run your program and you should see a rectangle moving to the right at constant speed! You should still be able to exit the program by pressing the Esc key on the keyboard. Pretty nice, right?

Back to index
Click here to go back to the index post.[Minix][Tutorial 11] Adding flappy and the mario pipes
Adding the bird
Download bird-0x114.bmp, edit it and place it inside the res/images folder.
Create a new class named Bird, I mean: create two files: Bird.c and Bird.h. Declare it in the Makefile.
For now, let's just try to make our little bird appear and make it fall.
Our bird will have a x and y coordinates, width, height, a vertical velocity and of course a bitmap image.
To make the little bird fall, I have set a GRAVITY. At each update, the gravity is added to the velocity, which will then be added to the bird's current y location:

Now we need to add a bird to our game state, initialize it and add the respective update, draw and delete method calls:


If you compile, install and run, you should now see flappy falling!
Making flappy jump
Now we need to make little flappy jump. You may have noticed that the bird update method receives an integer named jump. Well, my idea is: when the player presses the space bar on the keyboard, we will call this method with jump = 1, this tells flappy to jump. Otherwise, we just call flappy's update method with jump = 0.In order to accomplish this, let's modify flappy's update method - if jump == 1, let's modify it's velocity:

Now, let's modify the game state's update method to send jump == 1 when the space bar is released:

By the way, let's change flappy's default start position:

Quick preview
Compile and run. Now when you press the space bar, flappy flies! This is how the game looks like now. Cool isn't it?Increasing FPS
Our game might be running with a little lag. Let's change that.In FlappyNix.c:
const int FPS = 60;In Bird.c:
const int mouseFPSmult = 1;
const int GRAVITY = 1;If you now compile and run the game, it should be much smoother.
const int JUMP_VEL = -12.5;
Making flappy lose
Since everything is working so good, let's go further and make flappy die when it touches the ground. In order to do that, after each update, we need to check if the bottom of the bird's sprite is below the top of the ground sprite/image - easy, right?To start, I have created an integer groundY, because we were calculating it in the draw method - and draw methods should not contain any calculation what so ever. I initialize groundY in the constructor:

Furthermore, to check flappy's collision with the ground, I have implemented the gameOver function. For now it only checks if flappy hit the ground - I have created another function for that as well - but once we implement the moving pipes, we will also check if flappy collided with any of them in this function.

Since we are modifying the update function, and I would like to make flappy fly by pressing either the space bar or the left mouse button, let's add that option:

Compile and run the game. You should now be able to use either the space bar or the left mouse button to make flappy fly. If flappy touches the ground, you should lose and go back to the main menu.
Adding the pipes
So we are pretty much almost done! We just need to add the pipes now!So let's do it! Create Pipe.c, Pipe.h and declare it in the Makefile. This class will represent the pipe with the little gap through which flappy is supposed to fly.
Download top-pipe-0x114.bmp and bottom-pipe-0x114.bmp. Edit and place them inside your res/images folder.


Every pipe will be described by four variables: the x and y coordinates of the top left corner of the gap, and the width and height of each half of the pipe - this is for future convenience. The pipe constructor will have two parameters: the x where the pipe should be created and the ground y coordinate - because the pipe gap location will be randomly generated, we need to know the ground location to set the limit for the random function.
Since we are going to create a lot of pipes, it is not a good idea for each pipe to have it's own images of the top and bottom parts loaded. A better approach is to load those images only once, and use them to draw every pipe, only at different positions - this is known as flyweight, yet another design pattern. We can resolve this using something like a singleton, just like we did for the mouse.
Here is what everything described above looks like:

Ok, now it's time to implement the update, draw and delete methods. I have decided to put some global variables in Utilities.h, so yeah, I have made some changes to the rest of the code - you should be just fine without even having to do them, or if you do have to do them, it will be easy. Here is how the methods I told you to implement look like, as well as the global variables I created:

Ok, let's try to test our game by adding some pipes! Add an array of three pipe pointers in the GameState struct and initialize it like so:

Create a separate function to update and draw the pipes:

Do the same to delete them. Do not forget to delete the bitmaps as well, and even more important, to NULL reassign them:

Quick preview
Compile, install and run. This is what we got so far. How awesome is that?P.S. - I am terrible at playing this game.
Implementing the pipes generator
We have almost, almost done. We have some pipes moving, but now we have to keep them coming. After that we need to do something about the bird colliding with the pipes, and then our project is finished! So, let's go!The first step is to change the size of the pipes array. Since the maximum number of visible pipes on the screen is four, let's make the array have five pipes.

Now we have to edit the updatePipes function: when the left most pipe moves off the screen, we have to delete it, shift every pipe on the pipes array one time to the left and finally create a new pipe at the last position of the array. It is that simple!
Try to code this for yourself and only then compare with the screenshot below.

Adding pipe collisions
Fist things first: we need a simple function to detect AABB collisions. I implemented mine in Rectangle:
After that, we need to check if flappy really hit any pipe. Remember the gameOver function where I have previously told you we were going to do that? Well, let's actually do that there and now.
I created an integer variable called flappyHitPipe that is initialized with zero (false).
Then I created a rectangle which corresponds to the bird's image limits - bRect.
I am not quite sure about this one, but I guess we need to check collisions on the first two pipes, because although the first one might be a bit off the screen, flappy might be able to hit the second pipe before the first one is deleted. I do this with a simple for cycle.
Inside the for cycle we will need to check if our flappyHitPipe flag is already true - if it is, there is no need to check for any other collisions - therefore the continue;. If the flag is still false, we create two rectangles - pRect1 and pRect2 - corresponding to the top and bottom halves of the pipe being analysed; we then use the colliding function from Rectangle to check if the bird rectangle - bRect - is colliding either with pRect1 or pRect2 and update the flappyHitPipe flag accordingly. Then, inside the for cycle, I delete pRect1 and pRect2; outside the for cycle I delete the bRect. Finally, I return the flappyHitPipe flag. Here is everything explained above translated to code:

And here is a demonstration of flappy going through the pipes, against the pipes and against the floor. The collisions are working marvelously:
Although, you may have noticed a bug! If we press fast enough to make flappy fly really high, it won't hit the pipes because the pipes are not that high, and you will be able to keep flappy going as long as you wish:
There is a really simple way to solve this: make the collision rectangle of the top half of the pipe start for example at y = -500 and do not let flappy fly higher than this. Highlighted in the following screenshot are the parts of the code I had to modify to resolve this bug:

The end
Phew, what a long and dangerous journey this has been!These tutorials were great to write and I have learned a lot from them. I really like writing these tutorials, they test my patience. I just hope you have learned anything from them, even if it was just a little bit. The time has come for me to say good bye to this tutorial series and ship on to other projects.
If you would like to get in touch with me directly, go here.
Back to index
Click here to go back to the index post.
Subscribe to:
Posts (Atom)