Showing posts with label Meteor. Show all posts
Showing posts with label Meteor. Show all posts
Tuesday, October 6, 2015
Famo.us FlexGrid in CoffeeScript with Meteor
Did I just post something similar few hours ago? Indeed very similar. But this time, this goes on a very different scale. The same demonstration is now reactive with datasources coming from a MongoDB, your session or any reactive dictionary that Meteor can provide.
But wait... There's more. Actually, this is not a piece of code that you will paste into your Meteor project. It's a plugin. One command and one line of templating and it is set. One line of templating means: in just one single line of code.
This is all made possible thanks to the efforts of Gadi Cohen's excellent package's Famous-Views and his community (in which I contribute a bit).

Basically, here is how it works. Famo.us components are registered in the Meteor's templating engine. It can be regular components or home made ones. Using your favorite templating language, being Spacebar or Jade, you create the layout of your app. You connect your reactive datasource in your templating if they are already available or via small template helpers à la Meteor. It's like Famo.us/Angular with a full stack JS framework. And if you are using Jade, it is like drawing the Famo.us rendering tree with your code and connect it with reactive data source.
As an example, here is the code required for creating the example displayed in the video:
As an example, here is the code required for creating the example displayed in the video:
// This is pretty basic for every mobile app.
head
  title FlexGrid test
  meta(charset='utf-8')
  meta(name='viewport', content='width=device-width, maximum-scale=1, user-scalable=no')
  meta(name='apple-mobile-web-app-capable', content='yes')
  meta(name='apple-mobile-web-app-status-bar-style', content='black')
  meta(name='apple-mobile-web-app-capable', content='yes')
  meta(name='mobile-web-app-capable', content='yes')
body
  // Every Famo.us apps starts with a context.
  +famousContext id="mainCtx"
    // The code is divided into reusable templates
    // looking very much like web components.
    +flexGridExample

template(name='flexGridExample')
  // Now we create our 'render tree'.
  +Scrollview id='scrollview'
    // Here is the FlexGrid: it's indeed a single line of code!
    +FlexGrid id='flexgrid'
      // Here, I connect my datasource: a reactive array.
      +famousEach items
        // I use the available values in each item of the array
        // Note that CSS styles can be passed as reactive value,
        +Surface class='surf' properties=color
          // Or as reactive content.
          p= name
Simple. The community has also brought some others nice plugins that speeds up the creation of your app. The number of plugins available is growing fast.

3D hardware accelerated SVG using famo.us and Meteor
One of the main problem with SVG for Android or Chrome, desktop and mobile, is the lack of hardware acceleration. Multiple issues also prevents some nice effects like skewing for instance. Making smooth animated SVG in a browser or in Cordova tends to be tricky.
As stated in one of my former blog post, famo.us makes a good candidate for removing this pain and Meteor, with its famous-views package, makes a good candidate for tying up everything together.
This weekend, I've started working on a famous-views's plugin named fview-svg. Basically, it reads your SVG as template and create famo.us's
Here is a little video that demonstrates my first demo with fview-svg:
As you can check it in the source code, without the comments, this demo is less than 20 lines of codes. And there is room for improvements.
I've deployed a live demo and you can play with it: fview-svg.
I've tested on desktop in Safari, Chrome, Firefox and Opera. On iOS8, I've tested it, an iPad Mini, an iPad 2, an iPhone 5S. On Android, I've tested it on release 4.4.2 on a Samsung Galaxy Tab and on release 4.0.3 on an HTC Desire C. And this is this last test that just surprised me. You may not even know what this terminal is. It's a low end smarphone. Very cheap. A single core under 1GHz. What Android call a
The source codes of the plugin as well as a tutorial for recreating this demo are available on Github: fview-svg.
Note: The plugin is not already available on Atmosphere, the official Meteor repository. I wand to test it against several additional demos to check which API would be good to export for easing the integration. Still, you can start cloning it and import it in your project if you want to contribute or cannot wait few days.
Read more »
As stated in one of my former blog post, famo.us makes a good candidate for removing this pain and Meteor, with its famous-views package, makes a good candidate for tying up everything together.
This weekend, I've started working on a famous-views's plugin named fview-svg. Basically, it reads your SVG as template and create famo.us's
Surface and StateModifier out of it. One of the sensitive parts of the process was the inverted coordinate system of SVG compare to DOM and SVG's responsive nature. But the beauty of making it a plugin with famous-views is that it will be available for anyone. Nice.Here is a little video that demonstrates my first demo with fview-svg:
As you can check it in the source code, without the comments, this demo is less than 20 lines of codes. And there is room for improvements.
I've deployed a live demo and you can play with it: fview-svg.
I've tested on desktop in Safari, Chrome, Firefox and Opera. On iOS8, I've tested it, an iPad Mini, an iPad 2, an iPhone 5S. On Android, I've tested it on release 4.4.2 on a Samsung Galaxy Tab and on release 4.0.3 on an HTC Desire C. And this is this last test that just surprised me. You may not even know what this terminal is. It's a low end smarphone. Very cheap. A single core under 1GHz. What Android call a
midpi. These terminals still equip a large portion of Android's market share. Just to give you a glimpse on these terminals, it doesn't even run the first Angry birds properly... And here, the SVG animation was perfect. Fluid. I almost shed a tear.The source codes of the plugin as well as a tutorial for recreating this demo are available on Github: fview-svg.
Note: The plugin is not already available on Atmosphere, the official Meteor repository. I wand to test it against several additional demos to check which API would be good to export for easing the integration. Still, you can start cloning it and import it in your project if you want to contribute or cannot wait few days.
Pretty print in MongoDB
The bare minimum: pretty
Use JS'spretty function to prettify your JSON documents or collections within the Mongo's shell: db.find({}).pretty()
Here's the difference with a simple example:
~/.mongorc.js using this command: echo "DBQuery.prototype._prettyShell = true" >> ~/.mongorc.js
Thanks to Lee Machin for this tip: https://coderwall.com/p/3vfw9a
The cleanest one: Mongo-Hacker
Mongo-Hacker adds much more than a simple prettification: it adds colors and some additional API. Installing it with the following commands:npm -g install mongo-hackerNow, here is the same example with some nice hacking:

Do we need HTML and CSS when we got JavaScript or more? A case for AbsurdJS, Meteor, Famo.us and CoffeeScript.
Introduction
AbsurdJS is an amazing project. What is it about? A processor for your HTML and CSS in JavaScript. In JSON to be more precise.The problem
CSS was invented for designers. But do you really know that much designers that are able to provide you with a nice CSS rules that will be awesome on all screens? You are favored by gods if it is your case. Most of the time, they will provide you with some PSD (what an ugly form of design), AI (if you are lucky), Sketch or SVG (here, it is not anymore based on luck, it is like having an angel upon your shoulders).The same goes with HTML. Semantics that appears with HTML5 were added for SEO. But do you know that much SEO guys that will give you the right HTML code? I haven't seen any in my whole 20 years on the web carrier(though SEO is not that long of a job).
Thus, why are we using 3 languages for writing our codes. Is that right? Do we have to? Is it done for helping us and keeping separation of concerns? Funny. Patterns like this exists since the dawn of design patterns from the GoF. And what if we need to synchronize this HTML, CSS and JS back together for animations purposes? We request back in our code the HTML tags that we have just declared? We hooks on the CSS? If we need a color theme, do we have to write it twice or more? Funny, too. Even media queries for responsive web designs, seems like an odd way of reproducing the abstract factory pattern (or the bridge depending on if you know to who you are distributing your files).
The solutions
There are many. Generally, I was keen on using preprocessors: SASS, LESS, Stylus, YAML, Jade, Blade, CoffeeScript, Typescript, Dart, ... But, it finally does not give me a proper answer to the problems previously mentioned. It still need glue code to make all of this work together properly. Things started to shape up when I end up using Meteor, Famo.us and Velocity.js. The Blaze component of Meteor is transforming your HTML, more precisely, your HTML templates using Spacebar, a derivative of Mustache, into JS code. The same goes with Famo.us. It creates HTML and CSS rules that plays well together so that they limit layout trashing issues and combines this technics with advanced physic and animation engine. The same goes with Velocity.js. This jQuery plugins brings back synchronized CSS animations in with JS.Still, plain vanilla JavaScript is a pain to write. While there are plenty of transpilers that could lessen the burden (like Dart and Typescript, to mention the most used ones), none have proven to be as easy as CoffeeScript to me.
Conclusion
Now the solution starts to shape up. Why not use the power of AbsurdJS, Meteor, Famo.us and CoffeeScript? This combination would be a real full stack. It would goes from the persistance layer, the application server to the front end with one and only one language. A transpiled one that even lessen the number of lines that you need to write.Configure ESLint globally for Meteor 1.2 and React in Atom
Start by installing Atom's ESLint package linter-eslint via:
Now, install ESLint globally:
Within Atom, use the settings of ESLint to check Use Global Eslint and set the Global Node Path to

To taylor ESLint to our needs, we are using its simple YAML grammar in
Nice and readable.
[Edited: 09/10/2015]
The full source of this
Read more »
apm install linter linter-eslint
Now, install ESLint globally:
npm i -g eslint
Within Atom, use the settings of ESLint to check Use Global Eslint and set the Global Node Path to
/usr/local.
To taylor ESLint to our needs, we are using its simple YAML grammar in
~/.eslintrc:---
env:
browser: true
node: true
es6: true
meteor: true
mongo: true
jquery: true
ecmaFeatures:
arrowFunctions: true
blockBindings: true
classes: true
defaultParams: true
forOf: true
jsx: true
objectLiteralShorthandMethods: true
objectLiteralShorthandProperties: true
spread: true
superInFunctions: true
Nice and readable.
[Edited: 09/10/2015]
The full source of this
~/.eslintrc file is available on my Github account: https://github.com/PEM--/dotfiles/blob/master/eslintrcThe Best Meteor IDE
George McKnight shows us how to install Atom for Meteor development.
Thanks George for talking about our little plugins.
Read more »
Thanks George for talking about our little plugins.
Responsive SVG devices for famo.us and Meteor
Introduction
When creating a landing page or when demonstrating an app, there are often some smartphone, tablet or desktop screenshots. This pattern of demonstration could be a bit enhanced if instead of simple screenshots, the real app could be demonstrated. That would be the power of HTML5 sets in motion.The base component
Famo.us has a nice component that could be leverage for that: the ContainerSurface. It is basically a small context that can be clipped. By living in the same space of your main web site, it allows interesting demonstration patterns where you could demonstrate your app. The problem is to display this context exactly on the device that you want to present.By using an adaptive or a responsive SVG, you can extract coordinates of the device screen where you want to present your app. You can then instantiates a ContainerSurface on this same coordinates and put you app as its content.
In this little plugin fview-devices for famous-views, a Meteor package, this is exactly what is done. Here is a little demonstration of it:
You can also play with it in this live demo: fview-devices.
Conclusion
Beyond this little example, some interesting points emerge such as the capability to mix SVG and Famo.us. It paves the way to further enhancements. For instance, CSS Transform and Animation are possible in SVG. Unfortunately, they are not hardware accelerated. Worst, some browsers have very uneasy bugs to circumvent. By extracting portions of SVG and putting them into Famo.us surfaces, you regain hardware acceleration and circumvent issues from wrong implementations. Basically, you open up wider the capability to use SVG to the mobile platforms.It seems to me that a new story of apps using SVG, Famo.us and Meteor is about to begin. Happy coding.
A reactive favico for Meteor: rxFavico
I've packaged the nice favico.js project for Meteor: rxFavico. The added bonus is that it's now reactive. You simply modify a reactive dictionary, your favico changes automatically and all your associated display as well. This is handy for coupling it with a mailbox widget or the results of tests while developing.
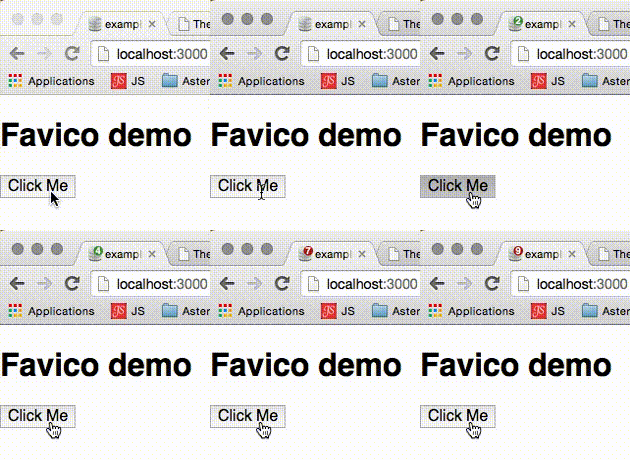 Here is how to install it:
Read more »
meteor add pierreeric:rxfavicoHere is an example in CoffeeScript for using it:
rxFavico.set 'count', 10The source are available on Github.
Meteor Ottawa and Ottawa Famo.us Meetup
Gadi grants us with a nice intro on using Meteor and Famo.us. Tutorial inside! Thank Gadi and thank to Ottawa's community.
Read more »
Atom is getting ready for Meteor 1.0.0
Thanks to Ben Strahan, Atom.io is getting ready for the upcoming Meteor-1.0.0 with the Meteor-Helper package.

There are also few others fixes and enhancements that you can see on the release notes: https://github.com/PEM--/meteor-helper/releases
Read more »
There are also few others fixes and enhancements that you can see on the release notes: https://github.com/PEM--/meteor-helper/releases
Create your CSS styles in CoffeeScript for Meteor
I've created my first Meteor package today: CSSC. This package eases the creation of CSS stylesheets in CoffeeScript.
For using it, adds the package into your Meteor's project:
I've also created 2 plugins for this package:
Read more »
For using it, adds the package into your Meteor's project:
meteor add pierreeric:csscOnce done, just create your stylesheets using DOM and CSSOM notation. For instance, I will create 2 classes
selected and unselected: if Meteor.isClientAs you can see it, the syntax is close to what you would use in Stylus or SASS (when using
Meteor.startup ->
css = new CSSC
css.add '.selected',
margin: CSSC.x 3
border: "3px solid #{CSSC.yellow}"
borderRadius: CSSC.x 5
css.add '.unselected',
color: CSSC.yellow
.sass notation).I've also created 2 plugins for this package:
- CSSC-Colors which allows inclusion of a nicer set of colors
- CSSC-Famous which avoids you from including CSS files from Famo.us.

With Meteor, this package and its plugins, you don't have to send CSS files to your client. Everything is packed within a single JS file.
PDF your collections, client side
Introduction
There are many ways to produce PDF on a website. You can use server side solutions for creating PDF, create CSS styles for print (and cross your finger waiting that all browser vendors will implement it) or create PDF on the client side. The two last solutions having the advantage not to take too much CPU on your infrastructure.Leveraging PDFKit and SimpleSchema
PDFKit provides an almost complete isomorphic solution for that. It allows you to choose where you want to implement your PDF creation. Very nice. Unfortunately (or not), it only comes with low drawing primitives and for creating your PDF you will need some serious work on it.When creating templates and forms for our collections, most of us are relying on Autoform. This solution is so nice that we tend to forget how incredible the amount of work this solution is doing for us. We just create a SimpleSchema of our collection and now we can display them, fill them, check the integrity of data provided by our users, and so forth. An incredibly productive package suite.
What if we could do the same for our PDF? That's what I was needing for a client. A solution that could take collections and create PDF out of them.
PDF Renderer
I've outsourced this solution in a package called pierreeric:pdfrenderer. Let's see a simple example on how to use it.First, we start creating our classic collection with a SimpleSchema. We tag the fields that we want to see in our PDF using a simple pdf: true attribute:
CustomerSchema = new SimpleSchemaNow for creating the PDF when the user click on a button, we can pass to the PdfRenderer some fields or the complete collection:
name:
type: String
label: TAPi18n.__ 'name'
images:
type: String
label: TAPi18n.__ 'images'
optional: true
autoform: afFieldInput:
type: 'fileUpload'
collection: 'Images'
address:
type: Object
label: TAPi18n.__ 'address'
'address.street':
type: String
label: TAPi18n.__ 'street'
pdf: true
'address.city':
type: String
label: TAPi18n.__ 'city'
pdf: true
Customers = new Mongo.Collection 'customers'
Customers.attachSchema CustomerSchema
if Meteor.isServer
if Customers.find().count() is 0
Customers.insert
name: 'Mathilde Charpentier'
address:
street: '227, rue Camille de Richelieu'
city: 'Strasbourg'
Meteor.publish 'customers', -> Customers.find()
if Meteor.isClient
Template.svgTest.onCreated ->
sub = @subscribe 'customers'
@autorun =>
if sub.ready()
@customer = Customers.findOne()
Template.svgTest.helpers
customer: -> Template.instance().customer
if Meteor.isClientYou can see a rendered PDF in the Github repository.
Template.svgTest.events
'click button': (e, t) ->
# Create the initial PDF document
pdf = new PdfRenderer size: 'a4'
# Load all required assets
pdf.addAsset "/cfs/files/images/#{t.customer.images}" if t.customer.images
# Use reactivity for loading assets if any
t.autorun ->
if pdf.ready()
# Customer image if exists
if t.customer.images?
pdf.img "/cfs/files/images/#{t.customer.images}", 'RIGHT',
width: 100
# Customer's name
pdf.h1 t.customer.name
# Address of customer
pdf.h2 TAPi18n.__ 'address'
pdf.schema CustomerSchema, 'address', t.customer
# End the PDF document, display it and enable back the PDF button
pdf.finish "file-#{t.customer.name}.pdf", ->
console.log 'PDF finished'
Conclusion
This example is pretty simple. It could be enhance with theming and templating. Coupled with a CMS like Orion, this could be an interesting block for covering e-commerce solution with automatic catalogue creation, web magazines with press capabilities, bookkeeping with automatic invoices generation, ... Hope you will like it and share your contributions on this little package. Happy coding.A better inheritance base class for Famo.us widget in Meteor
In former articles, I've proposed a base class for inheriting from Famo.us. There was something odd on the way I was using the
Here is my fixed example:
Read more »
DEFAULT_OPTIONS. Actually, it should be a static members. It makes the code even easier to write.Here is my fixed example:
class @MyWidget extends famous.core.View
  DEFAULT_OPTIONS:
    size: [undefined, undefined]
    # ... Put your expected defaults here
  constructor: (@options) ->
    super @options
    # ... Put your remaining initialization code here
Famo.us dot loader animation using Meteor's Famous-Views
A simple customizable dot loader ported for famous-views:
Source code: fview-dotloader
Demo site: fview-dotloader
Original work: LeXXik and Talves.
Read more »
Source code: fview-dotloader
Demo site: fview-dotloader
Original work: LeXXik and Talves.
Meteor Devops on OSX with Docker set for Ubuntu 15.04
Introduction
While using Meteor in development is an easy task and deploying it on Meteor's infrastructure is a no brainer, things may start to get messy if you need to deploy it, secure it and scale it on your cloud. Especially if your customer imposes you a specific constraint on cloud sovereignty. The best way to achieve easy deployment is using the excellent Meteor Up tool. But if it fails or if you need to go a bit further in your infrastructure deployment, I recommend that you start using Docker to get familiar with this handy DevOps tool.I hope that this tutorial will lead you on the appropriate tracks.
Versions applied in this tutorial
As you may need to update this tutorial for your own DevOps use cases, here is the complete list of versions used in this tutorial:- OSX 10.10.5 as the development platform
- Ubuntu 15.04 as Docker host system
- Debian Jessie 7 with latest updates as Docker container system
- Docker 1.8.1
- Docker Registry 2
- Docker Machine 0.4.1
- Docker Compose 1.4.0
- VirtualBox 5.0.2
- Meteor 1.1.0.3
- NGinx 1.9.4-1
- NodeJS 0.10.40
- Mongo 3.0.6 - WiredTiger
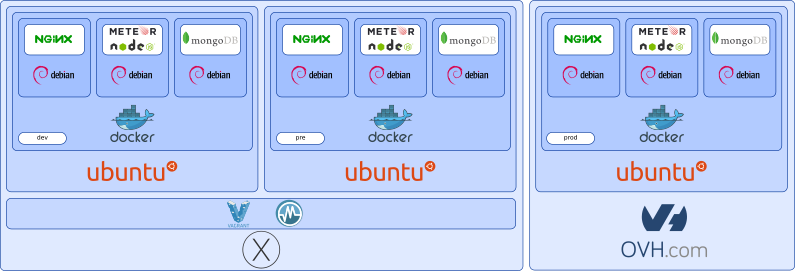
Why Debian Jessie instead of Debian Wheezie? Simple, a gain of 30MB of footprint. Note that we could have set this tutorial on other even smaller Linux distributions for our Docker Images, like Alpine Linux. But as time of this writing, these smaller distributions do not offer the package required for installing Meteor (namely, MongoDB and node-fibers).
Installing the tooling
If you have never done it before install Homebrew and its plugin Caskroom.ruby -e "$(curl -fsSL https://raw.githubusercontent.com/Homebrew/install/master/install)"Then install VirtualBox and Vagrant:
brew install caskroom/cask/brew-cask
brew cask install virtualbox vagrantNow install Docker and its tools:
brew install docker docker-machine docker-composeFor easing the access to VM and servers, we are using an SSH key installer:
brew install ssh-copy-idFor parsing and querying JSON produced by Docker, we are using
./jq:brew install jq
Some file structure
For differentiating the Meteor project from the DevOps project, we store our files like so:.The
├── app
└── docker
app folder contains the root of Meteor sources and the dockerfolder contains the root of DevOps sources.Create your virtual machines as Docker Machine
Create aVagrantfile that matches your production environment. Here, we are using an Ubuntu 15.04 with Docker pre-installed.hosts = {
"dev" => "192.168.1.50",
"pre" => "192.168.1.51"
}
Vagrant.configure(2) do |config|
config.vm.box = "ubuntu/vivid64"
config.ssh.insert_key = false
hosts.each do |name, ip|
config.vm.define name do |vm|
vm.vm.hostname = "%s.example.org" % name
#vm.vm.network "private_network", ip: ip
vm.vm.network "public_network", bridge: "en0: Wi-Fi (AirPort)", ip: ip
vm.vm.provider "virtualbox" do |v|
v.name = name
end
vm.vm.provision "shell", path: "provisioning.sh"
end
end
end
I've provided 2 network configurations here. The first one is a private network leading to 2 virtual machines that are not accessible to your local network ( only your local OSX). The second bridges your local OSX network driver so that your VMs gain public access within your LAN. Note that for both of these network configurations, I've used static IPs.Before creating our virtual machine, we need to setup a
provisioning.sh:#!/bin/bashNow, we are starting our virtual hosts and declare it as a Docker Machine:
# Overriding bad Systemd default in Docker startup script
sudo mkdir -p /etc/systemd/system/docker.service.d
echo -e '[Service]\n# workaround to include default options\nEnvironmentFile=-/etc/default/docker\nExecStart=\nExecStart=/usr/bin/docker -d -H fd:// $DOCKER_OPTS' | sudo tee /etc/systemd/system/docker.service.d/ubuntu.conf
# Set Docker daemon with the following properties:
# * Daemon listen to external request and is exposed on port 2376, the default Docker port.
# * Docker uses the AUFS driver for file storage.
# * Daemon uses Docker's provided certification chain.
# * Dameon has a generic label.
# * Daemon is able to resolve DNS query using Google's DNS.
echo 'DOCKER_OPTS="-H tcp://0.0.0.0:2376 -H unix:///var/run/docker.sock --storage-driver aufs --tlsverify --tlscacert /etc/docker/ca.pem --tlscert /etc/docker/server.pem --tlskey /etc/docker/server-key.pem --label provider=generic --dns 8.8.8.8 --dns 8.8.4.4"' | sudo tee /etc/default/docker
sudo systemctl daemon-reload
sudo systemctl restart docker
# Enable Docker on server reboot
sudo systemctl enable docker
# Remove and clean unused packages
sudo apt-get autoremove -y
sudo apt-get autoclean -y
vagrant up --no-provisionThroughout this terminal sessions, we need some environment variables. We store them in a
local_env.sh file that we fill step by step and source each time we open a new terminal session:export HOST_IP_DEV='192.168.1.50'If you are using Fish like me, use the following content:
export HOST_IP_PRE='192.168.1.51'
# Use preferably your FQDN (example.org)
export HOST_IP_PROD='X.X.X.X'
export HOST_IP_DEV='192.168.1.50'This should provide an easy access to all parts of the following network architecture:
export HOST_IP_PRE='192.168.1.51'
# Use preferably your FQDN (example.org)
export HOST_IP_PROD='X.X.X.X'
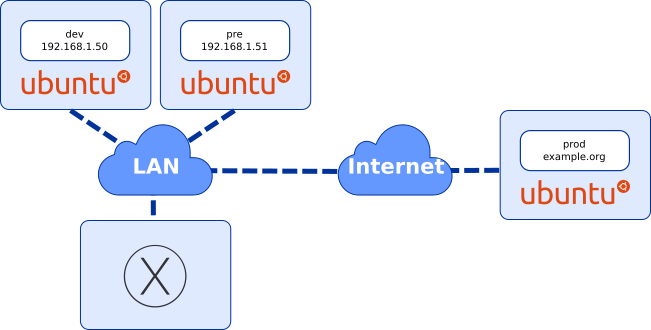
Open 3 terminal sessions. In the first session, launch the following commands:
docker-machine -D create -d generic \In the second session, launch the following commands:
--generic-ip-address $HOST_IP_DEV \
--generic-ssh-user vagrant \
--generic-ssh-key ~/.vagrant.d/insecure_private_key \
dev
docker-machine -D create -d generic \Now, in the last session, wait for the 2 previous sessions to be blocked on the following repeated message
--generic-ip-address $HOST_IP_PRE \
--generic-ssh-user vagrant \
--generic-ssh-key ~/.vagrant.d/insecure_private_key \
pre
Daemon not responding yet: dial tcp XX.XX.XX.XX:2376: connection refusedand issue the following command:vagrant provision
What's going on here? Actually, the current state of Docker for Ubuntu 15.04 doesn't supportIn this last section, we will finish our configuration of our development and pre-production hosts by installing Docker Machine and securing their open ports with simple firewall rules. The script that we are using is namedDOCKER_OPTS. This is due to the transition in Ubuntu from upstart to Systemd. Plus, when we are creating our Docker Machine in our local OSX, Docker Machine re-install Docker on the host. Thus, we end up with a screwed installation on the host unable to speak to the outside world (leading to the messageDaemon not responding yet: dial tcp XX.XX.XX.XX:2376: connection refused). Basically, the vagrant provisioning script patches both vagrant virtual servers. You can reuse the content of this script on your production server when you create the associated Docker Machine. For this, you can use the following command:ssh root@$HOST_IP_PROD "bash -s" < ./provisioning.sh
postProvisioning.sh.#!/bin/bashWe execute this script on both VM using simple SSH commands like so:
# Install Docker Machine
curl -L https://github.com/docker/machine/releases/download/v0.4.0/docker-machine_linux-amd64 | sudo tee /usr/local/bin/docker-machine > /dev/null
sudo chmod u+x /usr/local/bin/docker-machine
# Install Firewall
sudo apt-get install -y ufw
# Allow SSH
sudo ufw allow ssh
# Allow HTTP and WS
sudo ufw allow 80/tcp
# Allow HTTPS and WSS
sudo ufw allow 443/tcp
# Allow Docker daemon port and forwarding policy
sudo ufw allow 2376/tcp
sudo sed -i -e "s/^DEFAULT_FORWARD_POLICY=\"DROP\"/DEFAULT_FORWARD_POLICY=\"ACCEPT\"/" /etc/default/ufw
# Enable and reload
yes | sudo ufw enable
sudo ufw reload
ssh -i ~/.vagrant.d/insecure_private_key vagrant@$HOST_IP_DEV "bash -s" < ./postProvisioning.shNow you can access your VM either via Docker, Vagrant and plain SSH. To finish our VM configuration, we are going to allow full root access to the VM without requiring to use password. For that, you need a public and a private SSH keys on your local machine. If you haven't done it before simply use the following command:
ssh -i ~/.vagrant.d/insecure_private_key vagrant@$HOST_IP_PRE "bash -s" < ./postProvisioning.sh
ssh-keygen -t rsaNow, using Vagrant, copy the content of your
~/.ssh/id_rsa.pub in each of the VM's /root/.ssh/authorized_key.Reference your production host as a Docker Machine
In this example, we are using a VPS from OVH with a pre-installed Ubuntu 15.04 with Docker. These VPS starts at 2.99€ (around $3.5) per month and comes with interesting features such as Anti-DDos, real time monitoring, ...Preinstalled VPS comes with an OpenSSH access. Therefore, we will be using the generic-ssh driver for our Docker Machine just like we did for the Vagrant VM for development and pre-production. And like before, we are using 2 terminal sessions to overcome the Docker installation issue on Ubuntu 15.04.
In the first terminal session, we setup a root SSH access without password like so:
ssh-copy-id root@$HOST_IP_PROD
# Now, you should check if your key is properly copied
ssh root@$HOST_IP_PROD "cat /root/.ssh/authorized_keys"
cat ~/.ssh/id_rsa.pub
# These 2 last commands should return the exact same key
I've been tricked by some ssh-user-agent issue there. Docker wasn't reporting any issue even in debug mode and was just exiting with a default error code. So, be careful that your public key is exactly the same on your local machine, your VM and your production host.Next and still on the same terminal session, we declare our production host :docker-machine -D create -d generic \And on the second terminal session, when the message
--generic-ip-address $HOST_IP_PROD \
--generic-ssh-user root \
prod
Daemon not responding yet: dial tcp X.X.X.X:2376: connection refused appears on the first session, we launch:ssh root@$HOST_IP_PROD "bash -s" < ./provisioning.shThe last remaining step consists into solidifying our security by enabling a firewall on the host and removing the old packages:
ssh root@$HOST_IP_PROD "bash -s" < ./postProvisioning.sh
Creating your own registry
Basically, what we want to achieve is micro-services oriented to stick to a multi-tiers architecture: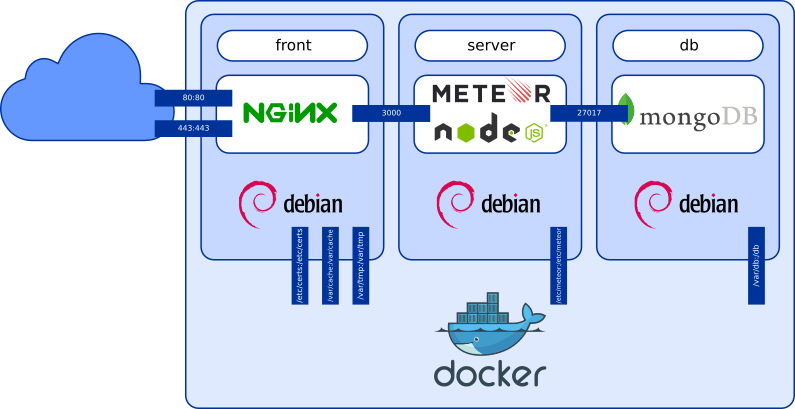
This architecture could then be spread over a Docker Swarm of multiple servers or kept on a single one. But playing with multiple containers in development is quickly a pain. We can leverage the power of Docker Compose and a local registry to fasten our development of Docker images.
In your first terminal session, activate your development Docker Machine:
eval "$(docker-machine env dev)"Create a Docker Compose file
# In Fish
eval (docker-machine env dev)
registry.yml:registry:Now, we will use the development Docker Machine as our local registry:
restart: always
image: registry:2
ports:
- 5000:5000
environment:
REGISTRY_STORAGE_FILESYSTEM_ROOTDIRECTORY: /var/lib/registry
volumes:
- /var/lib/registry:/var/lib/registry
ssh root@$HOST_IP_DEV "mkdir /var/lib/registry"For making it visible to our preproduction VM, we need to update our default firewall rules:
docker-compose -f registry.yml up -d
ssh root@$HOST_IP_DEV ufw allow 5000Now we are editing our
/etc/default/docker configuration file for adding this insecure registry in both our development and preproduction VM with this new flag:# On 192.168.1.50 & 192.168.1.51, in /etc/default/docker, we add in DOCKER_OPTS:We need to restart our Docker daemon and restart the Docker registry on the development VM:
--insecure-registry 192.168.1.50:5000
ssh root@$HOST_IP_DEV systemctl restart dockerOur final step in the registry management is to login your preproduction VM and your production server to Docker Hub using your Docker credential.
ssh root@$HOST_IP_PRE systemctl restart docker
eval "$(docker-machine env dev)"
eval "$(docker-machine env pre)"
docker login
eval "$(docker-machine env prod)"
docker login
Note that our registry isn't published outside our LAN. This makes it unusable for our production host. This development chain uses Docker Hub for publishing your images. Exposing this private registry to the outside world would require some additional configurations to tighten its security and server with a publicly exposed IP. While you could solely rely on Docker Hub for publishing your images, pushing and pulling to the outside world of your LAN are lengthy operations though lighten since Docker 1.6 and Docker Registry 2.
Building Mongo
Ourmongo/Dockerfile is based on Mongo's official one. It adds to the picture the configuration of small ReplicaSet for making OPLOG available:# Based on: https://github.com/docker-library/mongo/blob/d5aca073ca71a7023e0d4193bd14642c6950d454/3.0/DockerfileWe need a configuration file for this Docker image to be built
FROM debian:wheezy
MAINTAINER Pierre-Eric Marchandet
# Update system
ENV DEBIAN_FRONTEND noninteractive
RUN apt-get update && \
apt-get upgrade -y -qq --no-install-recommends && \
apt-get install -y -qq --no-install-recommends apt-utils && \
apt-get install -y -qq --no-install-recommends \
ca-certificates curl psmisc apt-utils && \
apt-get autoremove -y -qq && \
apt-get autoclean -y -qq && \
rm -rf /var/lib/apt/lists/*
# Grab gosu for easy step-down from root
RUN gpg --keyserver ha.pool.sks-keyservers.net --recv-keys B42F6819007F00F88E364FD4036A9C25BF357DD4 && \
curl -sS -o /usr/local/bin/gosu -L "https://github.com/tianon/gosu/releases/download/1.2/gosu-$(dpkg --print-architecture)" && \
curl -sS -o /usr/local/bin/gosu.asc -L "https://github.com/tianon/gosu/releases/download/1.2/gosu-$(dpkg --print-architecture).asc" && \
gpg --verify /usr/local/bin/gosu.asc && \
rm /usr/local/bin/gosu.asc && \
chmod +x /usr/local/bin/gosu
# Install MongoDB
ENV MONGO_MAJOR 3.0
ENV MONGO_VERSION 3.0.6
RUN groupadd -r mongodb && \
useradd -r -g mongodb mongodb && \
apt-key adv --keyserver ha.pool.sks-keyservers.net --recv-keys 492EAFE8CD016A07919F1D2B9ECBEC467F0CEB10 && \
echo "deb http://repo.mongodb.org/apt/debian wheezy/mongodb-org/$MONGO_MAJOR main" > /etc/apt/sources.list.d/mongodb-org.list && \
apt-get update && \
apt-get install -y -qq --no-install-recommends \
mongodb-org=$MONGO_VERSION \
mongodb-org-server=$MONGO_VERSION \
mongodb-org-shell=$MONGO_VERSION \
mongodb-org-mongos=$MONGO_VERSION \
mongodb-org-tools=$MONGO_VERSION && \
rm -rf /var/lib/apt/lists/* && \
rm -rf /var/lib/mongodb && \
mv /etc/mongod.conf /etc/mongod.conf.orig && \
apt-get autoremove -y -qq && \
apt-get autoclean -y -qq && \
rm -rf /var/lib/apt/lists/* && \
# Prepare environment for Mongo daemon: Use a Docker Volume container
mkdir -p /db && chown -R mongodb:mongodb /db
# Launch Mongo
COPY mongod.conf /etc/mongod.conf
CMD ["gosu", "mongodb", "mongod", "-f", "/etc/mongod.conf"]
mongo/mongod.conf:storage:We could build this image and run it, but I prefer using a Docker Compose file. These file eases the process of build, run and deploys of your Docker images acting as a project file when multiple Docker images are required to work together for an application. Here's the minimal
dbPath: "/db"
engine: "wiredTiger"
wiredTiger:
engineConfig:
cacheSizeGB: 1
collectionConfig:
blockCompressor: snappy
replication:
oplogSizeMB: 128
replSetName: "rs0"
net:
port: 27017
wireObjectCheck : false
unixDomainSocket:
enabled : true
docker/docker-compose.ymlthat we will enrich in the next steps of this tutorial:# Persistence layer: MongoBefore building or launching this Docker image, we need to prepare the volume on each host that receives and persists Mongo's data:
db:
build: mongo
volumes:
- /var/db:/db
expose:
- "27017"
ssh root@$HOST_IP_DEV "rm -rf /var/db; mkdir /var/db; chmod go+w /var/db"For building our Mongo Docker image:
ssh root@$HOST_IP_PRE "rm -rf /var/db; mkdir /var/db; chmod go+w /var/db"
ssh root@$HOST_IP_PROD "rm -rf /var/db; mkdir /var/db; chmod go+w /var/db"
docker-compose build dbAnd once it's running, initialize a single instance ReplicaSet for making Oplog tailing available:
# Or even faster, for building and running
docker-compose up -d db
docker-compose run db mongo db:27017/admin --quiet --eval "rs.initiate(); rs.conf();"Some useful commands while developing a container:
# Access to a container in interactive mode
docker run -ti -P docker_db

# Delete all stopped containers
docker rm $(docker ps -a -q)
# Delete all images that are not being used in a running container
docker rmi $(docker images -q)
# Delete all images that failed to build (untagged images)
docker rmi $(docker images -f "dangling=true" -q)

# In Fish
# Delete all stopped containers
docker rm (docker ps -a -q)
# Delete all images that are not being used in a running container
docker rmi (docker images -q)
# Delete all images that failed to build (dangling images)
docker rmi (docker images -f "dangling=true" -q)
Building Meteor
Meteor is fairly easy to build. It's a simple NodeJS app. We start by creating ourdocker/meteor/Dockerfile:# Based on: https://github.com/joyent/docker-node/blob/master/0.10/wheezy/DockerfileBefore building this Docker image, we need to prepare the volume on each host that receives its
FROM debian:wheezy
MAINTAINER Pierre-Eric Marchandet
# Update system
ENV DEBIAN_FRONTEND noninteractive
RUN apt-get update && \
apt-get upgrade -qq -y --no-install-recommends && \
apt-get install -qq -y --no-install-recommends \
# CURL
ca-certificates curl wget \
# SCM
bzr git mercurial openssh-client subversion \
# Build
build-essential && \
apt-get autoremove -qq -y && \
apt-get autoclean -qq -y && \
rm -rf /var/lib/apt/lists/*
# Install NodeJS
ENV NODE_VERSION 0.10.40
ENV NPM_VERSION 2.13.3
RUN curl -sSLO "https://nodejs.org/dist/v$NODE_VERSION/node-v$NODE_VERSION-linux-x64.tar.gz" && \
tar -xzf "node-v$NODE_VERSION-linux-x64.tar.gz" -C /usr/local --strip-components=1 && \
rm "node-v$NODE_VERSION-linux-x64.tar.gz" && \
npm install -g npm@"$NPM_VERSION" && \
npm cache clear
# Add PM2 for process management and PhantomJS
RUN npm install -g pm2 phantomjs
# Import sources
COPY bundle /app
# Install Meteor's dependencies
WORKDIR /app
RUN (cd programs/server && npm install)
# Launch application
COPY startMeteor.sh /app/startMeteor.sh
CMD ["./startMeteor.sh"]
settings.json used for storing your secrets in Meteor:ssh root@$HOST_IP_DEV "mkdir /etc/meteor"Now copy your
ssh root@$HOST_IP_PRE "mkdir /etc/meteor"
ssh root@$HOST_IP_PROD "mkdir /etc/meteor"
settings.json files on each hosts using a regular SCP. Mine are slightly different depending on the target where I deploy my Meteor apps.# Just an exammple, adapt it to suit your needs
scp ../app/development.json root@$HOST_IP_DEV:/etc/meteor/settings.json
scp ../app/development.json root@$HOST_IP_DEV:/etc/meteor/settings.json
scp ../app/production.json root@$HOST_IP_DEV:/etc/meteor/settings.json
Note that we do not include our secrets, nor in our code repository by using a .gitgignore file, nor in our Docker Images.We import our Meteor sources using a shared script docker/buildMeteor.sh for the Meteor container and the NGinx container:#!/bin/bashIn order to avoid importing too much files in our Docker image, we create a
rm -rf meteor/bundle nginx/bundle
cd ../app
meteor build --architecture os.linux.x86_64 --directory ../docker/meteor
cd -
cp -R meteor/bundle nginx
docker/meteor/.dockerignore file which removes the parts dedicated to the clients wich will be serverd by NGinx:bundle/READMEOur last required file is a script
bundle/packages/*/.build*
bundle/packages/*/.styl
bundle/*/*.md*
bundle/programs/web.browser/app
docker/meteor/startMeteor.sh for starting Meteor with the private settings that we add as a specific volume:#!/bin/bash
METEOR_SETTINGS=$(cat /etc/meteor/settings.json) pm2 start -s --no-daemon --no-vizion main.js
Note that we launch Meteor with PM2. As we will see it, it's not a mandatory step as we are using Docker's restart policy in our Docker images. However this process management utility could be used to get some metrics on NodeJS's status.For building and launching, we are extending our
/docker/docker-compose.yml file:# Application server: NodeJS (Meteor)For building and launching our Meteor Docker image:
server:
build: meteor
environment:
MONGO_URL: "mongodb://db:27017"
MONGO_OPLOG_URL: "mongodb://db:27017/local"
PORT: 3000
ROOT_URL: "https://192.168.1.50"
volumes:
- /etc/meteor:/etc/meteor
expose:
- "3000"
docker-compose up -d db server
Building NGinx
It's up to our front container to be created. Let's start with ourdocker/nginx/Dockerfile:# Based on: https://github.com/nginxinc/docker-nginx/blob/master/DockerfileLike the Meteor container, we are using the same import script. This time, we remove the server part of our container using the same technic in the
FROM debian:wheezy
MAINTAINER Pierre-Eric Marchandet
# Add NGinx official repository
RUN apt-key adv --keyserver pgp.mit.edu --recv-keys 573BFD6B3D8FBC641079A6ABABF5BD827BD9BF62
RUN echo "deb http://nginx.org/packages/mainline/debian/ wheezy nginx" >> /etc/apt/sources.list
ENV NGINX_VERSION 1.9.4-1~wheezy
# Update system
ENV DEBIAN_FRONTEND noninteractive
RUN groupadd -r www && \
useradd -r -g www www && \
apt-get update && \
apt-get upgrade -qq -y --no-install-recommends && \
apt-get install -qq -y --no-install-recommends \
ca-certificates nginx=${NGINX_VERSION} && \
apt-get autoremove -qq -y && \
apt-get autoclean -qq -y && \
rm -rf /var/lib/apt/lists/*
# Forward request and error logs to Docker log collector
RUN ln -sf /dev/stdout /var/log/nginx/access.log
RUN ln -sf /dev/stderr /var/log/nginx/error.log
# Configuration files
COPY nginx.conf /etc/nginx/nginx.conf
COPY conf host-specific /etc/nginx/conf/
# Mount points for volumes
RUN mkdir -p /etc/certs /var/cache/nginx /var/tmp
# Source
# Raw source files exposed as HTTP and HTTPS
COPY raw /www/
# Project files exposed as HTTPS
COPY bundle/programs/web.browser/*.js \
bundle/programs/web.browser/*.css \
bundle/programs/web.browser/packages \
bundle/programs/web.browser/app \
/www/
# Ensure proper rights on static assets
RUN chown -R www:www /www /var/cache /var/tmp
# Launch NGinx
COPY startNginx.sh /startNginx.sh
RUN chmod u+x /startNginx.sh
CMD ["/startNginx.sh"]
docker/nginx/.dockerignore:bundle/READMEFor building it, we enhance pour
bundle/packages/*/.build*
bundle/packages/*/.styl
bundle/*/*.md*
bundle/programs/server
docker/docker-compose.yml file:# Front layer, static file, SSL, proxy cache: NGinxOur NGinx requires certificates set on the hosts in
front:
build: nginx
links:
- server
environment:
# Can be: dev, pre, prod
HOST_TARGET: "dev"
volumes:
- /etc/certs:/etc/certs
- /var/cache:/var/cache
- /var/tmp:/var/tmp
ports:
- "80:80"
- "443:443"
/etc/certs. For the production host, you require SSL certificates from a certificate authority know by the browser vendors. For the development and the preproduction hosts, we can use self signed certificate that we create on our hosts:ssh root@$HOST_IP_DEV "mkdir -p /etc/certs; openssl req -nodes -new -x509 -keyout /etc/certs/server.key -out /etc/certs/server.crt -subj '/C=FR/ST=Paris/L=Paris/CN=$HOST_IP_DEV'"We need 2 additional volumes exposed on each host, one for NGinx's cache and another one for NGinx temporary files:
ssh root@$HOST_IP_PRE "mkdir -p /etc/certs; openssl req -nodes -new -x509 -keyout /etc/certs/server.key -out /etc/certs/server.crt -subj '/C=FR/ST=Paris/L=Paris/CN=$HOST_IP_PRE'"
ssh root@$HOST_IP_DEV "mkdir /var/cache; chmod go+w /var/cache; mkdir /var/tmp; chmod go+w /var/tmp"In our Docker Container, we have already imported the static part of our Meteor app that will be exposed through HTTPS. Our NGinx server will also act as a static file server in HTTP.Simply put your static assets in the
ssh root@$HOST_IP_PRE "mkdir /var/cache; chmod go+w /var/cache; mkdir /var/tmp; chmod go+w /var/tmp"
ssh root@$HOST_IP_PROD "mkdir -p /etc/certs; mkdir /var/cache; chmod go+w /var/cache; mkdir /var/tmp; chmod go+w /var/tmp"
docker/nginx/rawfolder for that.While serving HTTP file for our Meteor application has no interest, it could be usefull to expose some static assets without protection (this is sometime required by SSL certificate provider).We now need the configuration files our front. This configuration is mostly forked and customized from HTML5's boilerplate for NGinx servers. I will not explained all of them, simply the interesting parts that Meteor and our multi hosts configuration require. Our entry points is
docker/nginx/nginx.conf.# Run as a less privileged user for security reasons.Depending on which host launches NGinx, we need a method to set a proper sever name. For this, we create 3 files:
user www www;
# How many worker threads to run;
# The maximum number of connections for Nginx is calculated by:
# max_clients = worker_processes * worker_connections
worker_processes 1;
# Maximum open file descriptors per process;
# should be > worker_connections.
worker_rlimit_nofile 8192;
events {
# When you need > 8000 * cpu_cores connections, you start optimizing your OS,
# and this is probably the point at which you hire people who are smarter than
# you, as this is *a lot* of requests.
worker_connections 8000;
}
# Default error log file
# (this is only used when you don't override error_log on a server{} level)
error_log /var/log/nginx/error.log warn;
pid /var/run/nginx.pid;
# Main configuration
http {
# Hide nginx version information.
server_tokens off;
# Proxy cache definition
proxy_cache_path /var/cache/nginx levels=1:2 keys_zone=one:8m max_size=3000m inactive=600m;
proxy_temp_path /var/tmp;
# Define the MIME types for files.
include conf/mimetypes.conf;
default_type application/octet-stream;
# Update charset_types due to updated mime.types
charset_types text/xml text/plain text/vnd.wap.wml application/x-javascript application/rss+xml text/css application/javascript application/json;
# Format to use in log files
log_format main '$remote_addr - $remote_user [$time_local] "$request" '
'$status $body_bytes_sent "$http_referer" '
'"$http_user_agent" "$http_x_forwarded_for"';
# Default log file
# (this is only used when you don't override access_log on a server{} level)
access_log /var/log/nginx/access.log main;
# How long to allow each connection to stay idle; longer values are better
# for each individual client, particularly for SSL, but means that worker
# connections are tied up longer. (Default: 65)
keepalive_timeout 20;
# Speed up file transfers by using sendfile() to copy directly
# between descriptors rather than using read()/write().
sendfile on;
# Tell Nginx not to send out partial frames; this increases throughput
# since TCP frames are filled up before being sent out. (adds TCP_CORK)
tcp_nopush on;
# GZip Compression
include conf/gzip.conf;
# Error pages redirections
error_page 404 /404.html;
error_page 500 502 503 504 /50x.html;
# HTTP server
server {
# Server name
include conf/servername.conf;
# Protocol HTTP
listen [::]:80 ipv6only=on;
listen 80;
# Static files with fallback to HTTPS redirect
include conf/staticfile-with-fallback.conf;
# Redirect non-SSL to SSL
location @fallback {
rewrite ^ https://$server_name$request_uri? permanent;
}
}
# Upstream server for the web application server and load balancing
include conf/upstream-server-and-load-balancing.conf;
# Upgrade proxy web-socket connections
include conf/websocket-upgrade.conf;
# HTTPS server
server {
# Server name
include conf/servername.conf;
# Protocols HTTPS, SSL, SPDY
listen [::]:443 ipv6only=on ssl spdy;
listen 443 ssl spdy;
# SSL configuration
include conf/ssl.conf;
# SPDY configuration
include conf/spdy.conf;
# Static files with fallback to proxy server
include conf/staticfile-with-fallback.conf;
# Proxy pass to server node with websocket upgrade
location @fallback {
include conf/proxy-pass-and-cache.conf;
}
}
}
docker/nginx/host-specific/servername-dev.conf:sh # Server name server_name 192.168.1.50;docker/nginx/host-specific/servername-pre.conf:sh # Server name server_name 192.168.1.51;docker/nginx/host-specific/servername-prod.conf:sh # Server name (the real FQDN of your production server) server_name example.org;
@fallback function in case no file has been found. This is declared in the docker/nginx/staticfile-with-fallback.conf:# Serve static file and use a fallback otherwiseIn our HTTP part of our main configuration, you can see that the trafic is redirected to HTTPS via URL rewriting technic. Our SSL configuration
location / {
charset utf-8;
root /www;
# Basic rules
include conf/basic.conf;
# Try static files and redirect otherwise
try_files $uri @fallback;
# Expiration rules
include conf/expires.conf;
}
docker/nginx/conf/ssl.conf uses the exposed Docker Volume /etc/certs:# SSL configurationWe have also added SPDY to our HTTPS configuration in the
ssl on;
# SSL key paths
ssl_certificate /etc/certs/server.crt;
ssl_certificate_key /etc/certs/server.key;
# Trusted cert must be made up of your intermediate certificate followed by root certificate
# ssl_trusted_certificate /path/to/ca.crt;
# Optimize SSL by caching session parameters for 10 minutes. This cuts down on the number of expensive SSL handshakes.
# The handshake is the most CPU-intensive operation, and by default it is re-negotiated on every new/parallel connection.
# By enabling a cache (of type "shared between all Nginx workers"), we tell the client to re-use the already negotiated state.
# Further optimization can be achieved by raising keepalive_timeout, but that shouldn't be done unless you serve primarily HTTPS.
ssl_session_cache shared:SSL:10m; # a 1mb cache can hold about 4000 sessions, so we can hold 40000 sessions
ssl_session_timeout 1m;
# Use a higher keepalive timeout to reduce the need for repeated handshakes
keepalive_timeout 300; # up from 75 secs default
# Protect against the BEAST and POODLE attacks by not using SSLv3 at all. If you need to support older browsers (IE6) you may need to add
# SSLv3 to the list of protocols below.
ssl_protocols TLSv1 TLSv1.1 TLSv1.2;
# Ciphers set to best allow protection from Beast, while providing forwarding secrecy, as defined by Mozilla (Intermediate Set)
# - https://wiki.mozilla.org/Security/Server_Side_TLS#Nginx
ssl_ciphers ECDH+AESGCM:ECDH+AES256:ECDH+AES128:DES-CBC3-SHA:!ADH:!AECDH:!MD5;
ssl_prefer_server_ciphers on;
ssl_session_cache shared:SSL:10m;
# OCSP stapling...
ssl_stapling on;
ssl_stapling_verify on;
# DNS resolution on Google's DNS and DynDNS
resolver 8.8.8.8 8.8.4.4 216.146.35.35 216.146.36.36 valid=60s;
resolver_timeout 2s;
# HSTS (HTTP Strict Transport Security)
# This header tells browsers to cache the certificate for a year and to connect exclusively via HTTPS.
add_header Strict-Transport-Security "max-age=31536000;";
# This version tells browsers to treat all subdomains the same as this site and to load exclusively over HTTPS
#add_header Strict-Transport-Security "max-age=31536000; includeSubdomains;";
add_header X-Frame-Options DENY;
docker/nginx/conf/spdy.conf:# SPDY configuration
add_header Alternate-Protocol 443:npn-spdy/3;
# Adjust connection keepalive for SPDY clients:
spdy_keepalive_timeout 300; # up from 180 secs default
# enable SPDY header compression
spdy_headers_comp 9;
HTTP/2 support is on its way. When integrated to NGinx, this configuration will be upgraded for taking advantage of it.No that SSL and SPDY are set, we can serve the static file exposed via HTTPS with the same configuration as before for HTTP. But this time, the fallback mecanism redirect the trafic to our Meteor application (our server container). If no static file is found, the trafic is send to our Meteor application using a proxy with cache:
proxy_http_version 1.1;Our proxy cache needs to upgrade the HTTPS connections to WSS. This is achieved in our
proxy_pass http://server;
proxy_headers_hash_max_size 1024;
proxy_headers_hash_bucket_size 128;
proxy_redirect off;
# Upgrade proxy web-socket connections
proxy_set_header Upgrade $http_upgrade; # allow websockets
proxy_set_header Connection $connection_upgrade;
proxy_set_header X-Forward-Proto http;
proxy_set_header Host $http_host;
proxy_set_header X-Real-IP $remote_addr;
proxy_set_header X-Forward-For $proxy_add_x_forwarded_for;
proxy_set_header X-Forward-Proto http;
proxy_set_header X-Nginx-Proxy true;
proxy_cache one;
proxy_cache_key prj$request_uri$scheme;
proxy_cache_bypass $http_upgrade;
# Expiration rules
if ($uri != '/') {
expires 30d;
}
docker/nginx/conf/upstream-server-and-load-balancing.conf:# Upstream server for the web application serverFor directing our NGinx on the appropriate configuration, we use an simple environment variables
upstream server {
# server is included in each dynamic /etc/hosts by Docker
server server:3000;
# Load balancing could be done here, if required.
}
HOST_TARGET that can be dev, pre or prod and a script docker/nginx/startNginx.sh for using this variable:#!/bin/bashLike before for the other containers, we build it and launch it with:
if [ ! -f /etc/nginx/conf/servername.conf ]
then
ln -s /etc/nginx/conf/servername-$HOST_TARGET.conf /etc/nginx/conf/servername.conf
fi
nginx -g "daemon off;"
docker-compose up -dYou should now have a full development host.
Application logging
When launching, stopping, refreshing our services, Docker produces a log for each container that you can easily access in your CLI:docker-compose logsAs you can see it, it can start to be a bit verbose. Still, you can inspect any Docker container log with a tail like this:
# Or only for the db
docker-compose logs db
# Or only for the server
docker-compose logs server
# Or only for the server and the front...
docker-compose logs server front
# ...
$ docker psDocker logs are not regular
CONTAINER ID IMAGE COMMAND CREATED STATUS PORTS NAMES
82a7489e41a0 docker_front "/startNginx.sh" 4 hours ago Up 4 hours 0.0.0.0:80->80/tcp, 0.0.0.0:443->443/tcp docker_front_1
4b0656669213 docker_server "./startMeteor.sh" 27 hours ago Up 4 hours 3000/tcp docker_server_1
fe6a7238328a docker_db "mongod -f /etc/mongo" 45 hours ago Up 4 hours 27017/tcp docker_db_1
1a878c646094 registry:2 "/bin/registry /etc/d" 46 hours ago Up 46 hours 0.0.0.0:5000->5000/tcp docker_registry_1
$ docker logs --tail 4 -f docker_db_1
2015-09-03T12:20:49.298+0000 I NETWORK [initandlisten] connection accepted from 172.17.0.64:49051 #22 (18 connections now open)
2015-09-03T12:20:49.314+0000 I NETWORK [initandlisten] connection accepted from 172.17.0.64:49052 #23 (19 connections now open)
2015-09-03T12:20:49.315+0000 I NETWORK [initandlisten] connection accepted from 172.17.0.64:49053 #24 (20 connections now open)
2015-09-03T16:36:13.666+0000 I QUERY [conn10] g...
/var/log entries. They are specific to each ones of your container. There's an important risk to fill up your disk pretty fast depending on you log usages. Fortunately, since Docker 1.8, specific log driver can be added to our running container. We are using logrotate here but you could setup a specific server for an ELK stackor any other of your favorite log solution. For configuring our logrotate on each host, add a new configuration for Docker:ssh root@$HOST_IP_DEV "echo -e '/var/lib/docker/containers/*/*.log { \n rotate 7\n daily\n compress\n size=1M\n missingok\n delaycompress\n copytruncate\n}' > /etc/logrotate.d/docker"
ssh root@$HOST_IP_PRE "echo -e '/var/lib/docker/containers/*/*.log { \n rotate 7\n daily\n compress\n size=1M\n missingok\n delaycompress\n copytruncate\n}' > /etc/logrotate.d/docker"
ssh root@$HOST_IP_PROD "echo -e '/var/lib/docker/containers/*/*.log { \n rotate 7\n daily\n compress\n size=1M\n missingok\n delaycompress\n copytruncate\n}' > /etc/logrotate.d/docker"
Now, we are updating our docker/docker-compose.yml and set our Docker containers to use the json-file log driver so that it doesn't stay buried in /var/lib/docker/containers/[CONTAINER ID]/[CONTAINER_ID]-json.log:# Persistence layer: MongoFor taking this new logging configuration, just issue the following commands:
db:
build: mongo
log_driver: "json-file"
volumes:
- /var/db:/db
expose:
- "27017"
# Application server: NodeJS (Meteor)
server:
build: meteor
log_driver: "json-file"
environment:
MONGO_URL: "mongodb://db:27017"
MONGO_OPLOG_URL: "mongodb://db:27017/local"
PORT: 3000
ROOT_URL: "https://192.168.1.50"
volumes:
- /etc/meteor:/etc/meteor
expose:
- "3000"
# Front layer, static file, SSL, proxy cache: NGinx
front:
build: nginx
log_driver: "json-file"
links:
- server
environment:
# Can be: dev, pre, prod
HOST_TARGET: "dev"
volumes:
- /etc/certs:/etc/certs
- /var/cache:/var/cache
- /var/tmp:/var/tmp
ports:
- "80:80"
- "443:443"
log_driver: "json-file"
# This stops the current running containers
docker-compose stop
# This rebuild all images
docker-compose build
# This starts all containers
docker-compose up -d
Push to your local registry
When your are satisfied with the development of your container, you can save your Docker images into your local registry for deploying them to preproduction.For Mongo:
docker tag -f docker_db $HOST_IP_DEV:5000/mongo:v1.0.0For Meteor:
docker push $HOST_IP_DEV:5000/mongo:v1.0.0
docker tag -f docker_db $HOST_IP_DEV:5000/mongo:latest
docker push $HOST_IP_DEV:5000/mongo:latest
docker tag -f docker_server $HOST_IP_DEV:5000/meteor:v1.0.0For NGinx:
docker push $HOST_IP_DEV:5000/meteor:v1.0.0
docker tag -f docker_server $HOST_IP_DEV:5000/meteor:latest
docker push $HOST_IP_DEV:5000/meteor:latest
docker tag -f docker_front $HOST_IP_DEV:5000/nginx:v1.0.0
docker push $HOST_IP_DEV:5000/nginx:v1.0.0
docker tag -f docker_front $HOST_IP_DEV:5000/nginx:latest
docker push $HOST_IP_DEV:5000/nginx:latest
Deployment in pre-production
For deploying to production, we are going to refactor ourdocker/docker-compose.ymla bit to avoid repetition on Docker Compose file depending on the host that you're tageting.We create a
docker/common.yml file which centralized value used for all hosts:# Persistence layer: MongoNow, we can refactor our
db:
build: mongo
log_driver: "json-file"
volumes:
- /var/db:/db
expose:
- "27017"
# Application server: NodeJS (Meteor)
server:
build: meteor
log_driver: "json-file"
environment:
MONGO_URL: "mongodb://db:27017"
MONGO_OPLOG_URL: "mongodb://db:27017/local"
PORT: 3000
volumes:
- /etc/meteor:/etc/meteor
expose:
- "3000"
# Front layer, static file, SSL, proxy cache: NGinx
front:
log_driver: "json-file"
build: nginx
volumes:
- /etc/certs:/etc/certs
- /var/cache:/var/cache
- /var/tmp:/var/tmp
ports:
- "80:80"
- "443:443"
docker/docker-compose.yml to only set the remaining Docker command required for development:# Persistence layer: MongoNow for easing the deployment on the pre-production hosts, we are using our common configuration in a
db:
extends:
file: common.yml
service: db
# Application server: NodeJS (Meteor)
server:
extends:
file: common.yml
service: server
links:
- db
environment:
ROOT_URL: "https://192.168.1.50"
# Front layer, static file, SSL, proxy cache: NGinx
front:
extends:
file: common.yml
service: front
links:
- server
environment:
# Can be: dev, pre, prod
HOST_TARGET: "dev"
docker/deploy-pre.yml file that ease the pull and launch of your services:# Persistence layer: MongoConnect Docker Machine to your pre-production host, start your services and ensure that your ReplicationSet creation is applied:
db:
image: 192.168.1.50:5000/mongo:v1.0.0
extends:
file: common.yml
service: db
restart: always
# Application server: NodeJS (Meteor)
server:
image: 192.168.1.50:5000/meteor:v1.0.0
extends:
file: common.yml
service: server
links:
- db
environment:
ROOT_URL: "https://192.168.1.51"
restart: always
# Front layer, static file, SSL, proxy cache: NGinx
front:
image: 192.168.1.50:5000/nginx:v1.0.0
extends:
file: common.yml
service: front
links:
- server
environment:
# Can be: dev, pre, prod
HOST_TARGET: "pre"
restart: always
eval "$(docker-machine env pre)"Once you are satisfied with you containers, it's time to make them available to your production server.
docker-compose -f deploy-pre.yml up -d
docker-compose -f deploy-pre.yml run --rm db mongo db:27017/admin --quiet --eval "rs.initiate(); rs.conf();"
Push to Docker Hub
Now we go back on our development host for publishing these container on the public Docker Hub:eval "$(docker-machine env dev)"And we publish our containers for Mongo:
docker tag -f docker_db YOUR_DOCKER_HUB_LOGIN/mongo:v1.0.0For Meteor:
docker push YOUR_DOCKER_HUB_LOGIN/mongo:v1.0.0
docker tag -f docker_db YOUR_DOCKER_HUB_LOGIN/mongo:latest
docker push YOUR_DOCKER_HUB_LOGIN/mongo:latest
docker tag -f docker_server YOUR_DOCKER_HUB_LOGIN/meteor:v1.0.0For NGinx:
docker push YOUR_DOCKER_HUB_LOGIN/meteor:v1.0.0
docker tag -f docker_server YOUR_DOCKER_HUB_LOGIN/meteor:latest
docker push YOUR_DOCKER_HUB_LOGIN/meteor:latest
docker tag -f docker_front YOUR_DOCKER_HUB_LOGIN/nginx:v1.0.0
docker push YOUR_DOCKER_HUB_LOGIN/nginx:v1.0.0
docker tag -f docker_front YOUR_DOCKER_HUB_LOGIN/nginx:latest
docker push YOUR_DOCKER_HUB_LOGIN/nginx:latest
Deployment in production
Like the deployment in pre-production, we are leveraging the capabilities of Docker Compose for easing the pulling and running of Docker containers. For this, we create adocker/deploy-prod.yml file:# Persistence layer: MongoBefore running everything in production, we must pull our images. Behind the scene so that our users doesn't notice the changes, then we will stop our current running containers, launch our new ones and finish by a ReplicaSet configuration.
db:
image: YOUR_DOCKER_HUB_LOGIN/mongo:v1.0.0
extends:
file: common.yml
service: db
restart: always
# Application server: NodeJS (Meteor)
server:
image: YOUR_DOCKER_HUB_LOGIN/meteor:v1.0.0
extends:
file: common.yml
service: server
links:
- db
environment:
ROOT_URL: "https://YOUR_SITE_FQDN"
restart: always
# Front layer, static file, SSL, proxy cache: NGinx
front:
image: YOUR_DOCKER_HUB_LOGIN/nginx:v1.0.0
extends:
file: common.yml
service: front
links:
- server
environment:
# Can be: dev, pre, prod
HOST_TARGET: "prod"
restart: always
eval "$(docker-machine env prod)"
docker-compose -f deploy-prod.yml pull
docker stop "$(docker ps -a -q)"
docker-compose -f deploy-prod.yml up -d
docker-compose -f deploy-prod.yml run --rm db mongo db:27017/admin --quiet --eval "rs.initiate(); rs.conf();"
Links
Sources for this tutorial:Informations used for this tutorial:
- Homebrew
- Caskroom
- Easy sending your public SSH key to your remote servers
- Docker documentation
- Docker Installation on Ubuntu
- Secure Docker
- The dangers of UFW + Docker
- OpenSSL Howto
- Control and configure Docker with Systemd
- How to configure Docker on Ubuntu 15.04 (workaround)
- Ulexus/Meteor: A Docker container for Meteor
- VPS SSD at OVH
- Your Docker Hub account
- Creating a single instance MongoDB replica set for Meteor
- jq is a lightweight and flexible command-line JSON processor
- How to add environment variables to nginx.conf
- MongoDB configuration options
- MongoDB sample YAML files
- The magic of Meteor oplog tailing
- Docker: Containers for the Masses -- using Docker
- How To Create an SSL Certificate on Nginx for Ubuntu 14.04
- SSL and Meteor.js
- HTML5's boilerplate for NGinx servers
Fullscreen D3 graphs
What are we going to tackle?
When creating D3 graphs, the more graphs you put in your page, the less readable it tends to be. A friend of mine advise me to set my graphs in fullscreen. I immediately loved the idea. That would definitely help users to focus.
What do we need to solve?
- Our graphs need to be responsive: when they will be toggled on fullscreen, they need to expand and take as much space as possible.
- When setting up fullscreen, the viewport is black despite all your already setup styles.
- Tooltips on your graphs needs to be included in the fullscreen's viewport.
- As your viewport is changing so are the references on where your tooltips needs to be displayed.
Piece by piece solution
First, let's setup our markup in Jade. figure is our SVG container, the div, .svg-content, is where D3 will place our SVG content and the div, .tip, is our tooltip for this graph:
figureNow, we need to setup our style so that our SVG content takes the available width of its container or the width of the viewport when it will be set on fullscreen. Note that we also need to set the background color of the container so that we don't end up with a black viewport. Here is the relevant extract of the Sylus file:
.svg-content
.tip
span Point
.arrow
// Container for responsive SVGFor the tooltip, we use a fixed position that will be modified using our logic. The style is pretty straightforward in Stylus:
// Mixin for creating SVG container with specific aspect ratio
svgContainer()
display inline-block
position relative
width 100%
vertical-align middle
overflow hidden
figure
display inline-block
absolute top left
height 100%
margin 0
// This container targets 1:1 SVG
svgContainer()
.svg-content
// Here are the properties for the fullscreen content
&:fullscreen
size 100%
background white
.tipNow, for creating a responsive D3 graph, we need to use the preserveAspectRatio and the viewBox attributes on the graph instead of the regular width and height on the SVG tag. This is what is done by the following logic in Coffee on a 100x100 graph:
fixed top left
svgWidth = svgHeight = 100Setting the graph in fullscreen is eased thanks to screenfull.js. This library provide a cross browser API of the vanilla JavaScript Fullscreen API:
svg = d3.select '.svg-content'
.append 'svg:svg'
.attr 'preserveAspectRatio', 'xMinYMin meet'
.attr 'viewBox', "0 0 #{svgWidth} #{svgHeight}"
Template.home.rendered = ->Now, we need to adjust the tooltips so that they are positioned properly. In our example, we are using a Voronoï diagram. Hovering on the path elements of the Voronoï is triggering the tooltip of its points modeled by circle elements. Getting the position is achieved thank to the DOM API getBoundingClientRect:
@fullscreen = ->
return screenfull.exit() if screenfull.isFullscreen
target = (@$ '.svg-content')[0]
screenfull.request target
Template.home.events
'click button': (e, t) ->
$button = t.$ e.target
role = $button.attr 'data-role'
t.fullscreen() if role is 'fullscreen'
  tip = @$ '.tip'
  @positionSetTip = (circle) ->
    rect = circle[0].getBoundingClientRect()
    tip.css 'transform', "translate3d(\
      #{rect.left + .5 * (rect.width - tip.width())}px,\
      #{rect.top - tip.height()}px, 0)"
  @showHideTip = -> tip.toggleClass 'show'
  @showTip = -> Meteor.setTimeout (-> tip.addClass 'show'), 300
  # A debouncing function is used for transitioning over path
  @lazyShowHideTip = _.debounce @showHideTip, 300
  path = svg.append 'g'
    .selectAll 'path'
  svg.append 'g'
    .selectAll 'circle'
    .data vertice
    .enter()
    .append 'circle'
      .attr 'transform', (d) -> "translate(#{d.toString()})"
      .attr 'r', 1
  data = path.data (voronoi vertice)
  data
    .enter()
    .append 'path'
      .attr 'd', polygon
      .order()
      .on 'mouseover', (d, i) =>
        circle = $ "circle:nth-child(#{i + 1})"
        @positionSetTip circle, i
        @showTip()
      .on 'mouseleave', =>
        @lazyShowHideTip()
  data.exit().remove()
Some links
- Demo of a Voronoï diagram set in fullscreen.
- Source of the demo is available on Github.
- The library used for easing the cross browser setup of the Fullscreen API: screenfull.js.
- Creative & Pure is the used CSS framework for this little demo.
Bonus
On the demo, I've also added some features like:
- An animated tooltip: when entering or leaving a small animation is done.
- The Voronoï graph is animated using a simple random function.
- Key events are handle to let you set the graph in fullscreen or to animate it.
Happy coding!
Some Famo.us demo with Meteor
Lately with famous-views, a package for Meteor, we have added some plugins for easing developments. To better demonstrate how to use them and what they bring, I've added some live demo for each one that I've created.
Here is a fast access to these demo:
Read more »
Here is a fast access to these demo:
- fview-bksurfaceimage: Adaptive images.
- fview-devices: Responsive SVG devices working as container for demoing apps.
- fview-dotloader: Simple and customizable loader.
- fview-slidedeck: Slide deck engine à la Bespoke, Reveal, Impress, Prezzi.
- fview-flexgrid: Flexible grid.
Jade within Atom.io: Fasten your HTML and SVG authoring and template debugging
When writing HTML, XML, SVG or templates based on this language, it is cumbersome to open and close tags. Even with a good editor that closes tags for you or a good plugin that write snippet codes, you end up with unreadable and long source files. Jade removes this hassle by providing a simple and elegant code that transpiles to tagged code.
Here's an example of Jade transpiled to HTML:

However, it is sometime handy to seen what your generated code will look like. I've published another Atom.io plugin that preview the generated results with ctrl+alt+j.
The package is available on Atom.io's repository: https://atom.io/packages/jade-compile
And its code source is available on Github: https://github.com/PEM--/jade-compile
Read more »
Here's an example of Jade transpiled to HTML:
However, it is sometime handy to seen what your generated code will look like. I've published another Atom.io plugin that preview the generated results with ctrl+alt+j.
The package is available on Atom.io's repository: https://atom.io/packages/jade-compile
And its code source is available on Github: https://github.com/PEM--/jade-compile
Debug Meteor with Atom and customize Meteor's access to MongoDB
I've just updated my Atom.io's plugin Meteor Helper with 2 new features: debug mode and custom Mongo URL.

For debugging your Meteor's server side app, just set the Debug flag, launch a Node-Inspector and open your Chrome navigator on the URL provided by Node-Inspector. Basically, it covers the Step 2 of the Meteorpedia article on debugging.
For launching Meteor so that it uses an alternate MongoDB instance, you simply specify the access to this instance. Default installation of MongoDB are usually accessed via
Read more »
For debugging your Meteor's server side app, just set the Debug flag, launch a Node-Inspector and open your Chrome navigator on the URL provided by Node-Inspector. Basically, it covers the Step 2 of the Meteorpedia article on debugging.
For launching Meteor so that it uses an alternate MongoDB instance, you simply specify the access to this instance. Default installation of MongoDB are usually accessed via
mongodb://localhost:27017. Revert back to the classical MongoDB within Meteor, blank the content of the Mongo URL input field.
Subscribe to:
Posts (Atom)