Tuesday, October 6, 2015

Facebook adds support for 360-degree videos


360-degree video has arrived on Facebook.
The social network is beginning to add the immersive videos to the News Feed, the company announced Wednesday. The videos will be viewable from the web and from Facebook's iOS and Android apps.
The videos, first announced at Facebook's F8 developer conference, are filmed with a special camera setup that captures q full 360-degree view of the scene. Much like the 360-degree videos on YouTube, you can change your view of the video by dragging you finger (or cursor, if you're on a browser) around the screen or holding your phone at a different angle.
The videos will be available on the web and Android app first and will roll out to the iOS app "in the coming months."
Facebook is partnering with a select group of publishers on the videos — including Disney and Lucasfilm, GoPro, Vice and Saturday Night Live — to start but says it will open up the videos to more people "who are at the cutting edge of exploring this medium" in the next few days.
360 full-screen

IMAGE: FACEBOOK
The eventual plan, it seems, is to open up the video to all users, not just filmmakers and media companies.
"In the future, imagine watching 360 videos of a friend’s vacation to a small village in France or a festival in Brazil — you’ll be able to look around and experience it as if you were there," Maher Saba, Facebook's engineering director for video, writes in a statement. "Along with updates from your friends and family, you will also be able to discover amazing new content on Facebook from media companies, organizations, and individual creators."
But 360-degree vacation videos may be farther off for most Facebook users. Though consumer level cameras, like RIoch's new Theta S, are increasingly common as Google and others move to adopt the immersive videos, relatively few people have access to the equipment necessary to make these videos.
The videos also have big implications for the company's virtual reality ambitions. Facebook users will eventually be able to view the videos through the Oculus Rift and other virtual reality headsets; the videos were created as a collaboration with the Oculus team, The Verge reports.
The social network is also rumored to be working on a standalone video app for the 360-degree clips and executives have made it clear they see virtual and augmented reality as the next big medium for Facebook to tackle.
"When Facebook was founded, it was primarily a text based site: there was status posts and there were wall posts," Jay Parikh, the company's VP of global engineering and infrastructure, said at the company's @Scale engineering conference last week. "We’ve moved in to a world where most of the world today is focused on photos. But we’re quickly moving into this world where I think, in the next couple years, most of the experience on Facebook is going to be about video. It doesn’t just stop with videos ... what we see happening in the next couple years is bringing augmented reality and virtual reality to the experience that is on Facebook."

Have something to add to this story? Share it in the comments.
Read more »

Ad blocking for the masses, part two: Adblock Browser

Last week, ABP went beyond releasing extensions and launched a standalone Adblock Browser for Android and iOS that has built-in blocking capabilities. Before we take a look at the browser itself, it is worth noting ABP’s interesting (and some call it controversial) business model. ABP signs contracts with companies that agree to its acceptable ads guidelines. Ads from these companies are allowed to pass through the ABP ad filter.In part two of this series on the state of ad blockers, I take a look at a new product from a well-known company whose earlier product has been available for nearly a decade: Adblock Plus (ABP). Adblock Plus develops extensions for web browsers which can block tracking, malware sites, and, of course, ads.
In a 2014 interview, ABP lead investor Tim Schumacher said that only the largest companies pay for these contracts. “Adblock Plus has been experimenting with different models,” he said. “I can’t talk about specific contracts, but in some cases it was performance-based and in other cases it was more of a flat fee. More that 90% of companies don’t pay at all.”
adblockbrowser_ad_noad
The first thing you should know about the free Adblock Browser is that, unsurprisingly, it works better on recent devices with faster processors. For example, it ran slowly on an iPad 2 with a 32-bit processor in my tests. So, slow, in fact, that there is not much speed advantage to using Safari with ads displayed. However, on a iPhone 6+ with a faster 64-bit processor, Adblock Browser rendered the mostly ad-less web pages fast enough to be interesting and useful. On the Android side, I tested it using a Nexus 4 and Nexus 6.
adblockbrowser_2_moreblocking
Here’s the use case that makes Adblock Browser interesting and useful for me: I generally use Google’s own Chrome browser on Android devices and read web pages with ads. However, I often find interesting news items in my Google Now feed. And, some of the sources are either unfamiliar to me with possibly heavy handed ads or are from interesting sources with known heavy ads. So, I have links from Google Now handled by Adblock Browser.
A single ad blocking filter is selected by default: ABP’s own EasyList. ABP describes it as: “The EasyList subscriptions are lists of filters designed for Adblock Plus that automatically remove unwanted content from the internet, including annoying adverts, bothersome banners and troublesome tracking. The subscriptions are currently maintained by four authors.” You can use the Ad Blocking setting option to choose filters for other languages.
The “More blocking options” page lets you select options such as disabling tracking. Surprisingly, the option to disable malware domains is turned off by default.
adblockbrowser_3_nonintrusive
The “Acceptable Ads” option is turned on by default. As I noted earlier, this allows ads to be displayed from companies who sign a paid or free contract with ABP to agree to display non-intrusive ads.
Finally, in the Privacy settings window, you can choose to turn off cookies and tracking (which are, by default, allowed). It also provides controls for remembering passwords (off by default), and clearing private data manually. There is also an option to clear the cache upon a manual exit using the Quit option. However, I didn’t see a Quit option in the Android app, and I didn’t see this cache setting in the iOS app.
It is worth noting a few differences between the iOS and Android versions of Adblock Browser. The iOS version lets you choose between DuckDuckGo (the default) and Google as its search engine. You can choose from a much larger list of search engines in the Android version. URL suggestions are turned off by default, but can be turned on. The Android version has a large number of display options, including enabling zoom on pages that normally do not allow zooming on mobile devices. The Android version also has an option to save a web page as a PDF file (Settings -> Page -> Save as PDF).
adblockbrowser_4_privacy
The recently released free Adblock Browser for iOS and Android makes it easy for non-technical people to reduce the number of mobile web ads they see and protect themselves from known malware sites. It is one more tool that makes it easier for anyone to have an arguably improved mobile web experience.
If you missed part one in this series, check out: Ad blocking for the masses, part one: uBlock Origin. Finally, stay tuned for part three, where we will take a closer look at Apple’s Content Blocking Safari Extensions that will be made available in the iOS 9 update released September 16.
Read more »

Gmail finally lets you block annoying senders

Gmail-block-unsubscribe
IMAGE: GOOGLE
The unsubscribe option was previously available on the desktop version of Gmail, but now you can get off that annoying mailing list from your Android device as well. As for blocking a sender completely, that's new both on Android and the web.
The "block" option is in the message's right side corner menu, just below the "print" option. Tap it and you'll never hear from that sender again (their emails will go directly to the spam folder). If you want to unblock someone, you can do so in Gmail's Settings. "Unsubscribe" is located in the app's top-right corner menu (while you're viewing a message), below the "Mark important" option.
Check out how this all works in Google's handy gifs, below.
Block Gmail

IMAGE: GOOGLE
Unsubscribe Gmail

IMAGE: GOOGLE
Both features will be gradually rolling out to users, with "block" coming to the web in 1-3 days, while both options could take longer than three days to appear on Android
Read more »

Google's a new logo


Google is introducing a new logo today. Just a month after unveiling a major restructuring of the company, Google is updating its image, too. The new Google logo is still a wordmark, but it's now using a sans-serif typeface, making it look a lot more modern and playful. The colors are also softer than they used to be. The logo bears a bit more resemblance to the logo of Google's new parent company, Alphabet, as well. Alphabet's wordmark has a similarly unadorned look, and this update makes the two companies' design language fall more inline.
As Google's video introducing the new logo notes, the wordmark has been evolving ever since it was created in 1998. But this is easily its biggest change since 1999, when Google first cleaned up the lettering and settled on its four colors. Since then, the logo has just been flattened out more and more, with today's update representing a huge leap. In addition to changing up the wordmark, Google is also changing the tiny "g" logo that you see on browser tabs. It's now going to be an uppercase "G" that's striped in all four of Google's colors. Google says that the new design will be rolling out across all of its products soon — in fact, it's already on Google's homepage, with a cute animation that wipes away the old logo and draws in the new one.
THE NEW LOGO IS MEANT TO REFLECT THE NEW WAYS PEOPLE VISIT GOOGLE
So why did Google decide to make the change? In a blog post, Google discusses how much technology has changed how we interact with its products and with the internet at large. It doesn't really settle on a specific reason that a redesign was needed, but it says that this logo should better reflect the reality that Google is no longer a site you visit on a desktop computer — it's a huge collection of sites, apps, and services that you visit on PCs, Chromebooks, smartphones, and anywhere you can find a web browser. Google writes that its new logo is meant to reflect "this reality and [show] you when the Google magic is working for you, even on the tiniest screens."
Making the logo look good on small screens seems to have been a major consideration. The new, simpler lettering is supposed to scale better to smaller sizes, making the wordmark more distinct and easier to read. It's also supposed to be easier for Google to display on low-bandwidth connections: Google says that it's made a version of its logo that's "only 305 bytes, compared to our existing logo at ~14,000 bytes." Given that one of new Google CEO Sundar Pichai's big goals is to bring the internet — and Google, of course — to areas of the globe that don't already have it, that small difference is definitely going to be an important one.


You can also see the new Google "G" beginning to appear across its services. Among the more notable is Google+, which is now represented by a big colorless version of the new G.


Read more »

New tutorial series about Minix 3.1.8

Hello everyone!

As you might not know, I live in Portugal and I am studying computer engineering at FEUP, in Oporto.

I'm currently taking a course called Computer Labs. To sum it up: we start with an image of a Linux micro kernel called Minix. We run it through VMPlayer on Ubuntu.
From there we mess with registers and program the basics for all the devices from scratch: graphics card, timer, keyboard, mouse, rtc, uart. We must program them in interrupt or polling mode.

If you are wondering if that is easy: well it depends. Most of the times, we rage quit. Other than that, once you get how things work (on the lab before the last one), things should start to make sense?

All this to announce a new series of tutorials, where I'll explain how to set up the virtual machine, how to use Eclipse to code stuff via Remote System Explorer, basic Minix commands and how to do... stuff!

The course is near the end and my final project is almost done. It looks good I must say!
So yeah, this series will be useful for me because I'll get to review every detail from the very start. I'll record my progress so I can check it in the future if I need to.

Actually, I think this series will be of great value for future students who need to take the course or a similar one, and for my friends who didn't quite understand things properly at first and will have to take the course again next year.
Whichever the case is: good luck!

I'll start the series soon!

Back to index

Click here to go back to the index post.
Read more »

Famo.us FlexGrid in CoffeeScript with Meteor

Did I just post something similar few hours ago? Indeed very similar. But this time, this goes on a very different scale. The same demonstration is now reactive with datasources coming from a MongoDB, your session or any reactive dictionary that Meteor can provide. 


But wait... There's more. Actually, this is not a piece of code that you will paste into your Meteor project. It's a plugin. One command and one line of templating and it is set. One line of templating means: in just one single line of code.

This is all made possible thanks to the efforts of Gadi Cohen's excellent package's Famous-Views and his community (in which I contribute a bit).

Basically, here is how it works. Famo.us components are registered in the Meteor's templating engine. It can be regular components or home made ones. Using your favorite templating language, being Spacebar or Jade, you create the layout of your app. You connect your reactive datasource in your templating if they are already available or via small template helpers à la Meteor.  It's like Famo.us/Angular with a full stack JS framework. And if you are using Jade, it is like drawing the Famo.us rendering tree with your code and connect it with reactive data source.

As an example, here is the code required for creating the example displayed in the video:
// This is pretty basic for every mobile app. 
head
title FlexGrid test
meta(charset='utf-8')
meta(name='viewport', content='width=device-width, maximum-scale=1, user-scalable=no')
meta(name='apple-mobile-web-app-capable', content='yes')
meta(name='apple-mobile-web-app-status-bar-style', content='black')
meta(name='apple-mobile-web-app-capable', content='yes')
meta(name='mobile-web-app-capable', content='yes')
body
// Every Famo.us apps starts with a context.
+famousContext id="mainCtx"
// The code is divided into reusable templates
// looking very much like web components.
+flexGridExample

template(name='flexGridExample')
// Now we create our 'render tree'.
+Scrollview id='scrollview'
// Here is the FlexGrid: it's indeed a single line of code!
+FlexGrid id='flexgrid'
// Here, I connect my datasource: a reactive array.
+famousEach items
// I use the available values in each item of the array
// Note that CSS styles can be passed as reactive value,
+Surface class='surf' properties=color
// Or as reactive content.
p= name

Simple. The community has also brought some others nice plugins that speeds up the creation of your app. The number of plugins available is growing fast.
Read more »

[Minix] Posts index

Minix

Final result preview

I thought it would be appropriate to have a preview of the final result of the project covered in these tutorial series in it's index, so here it is:


Table of contents

Introduction
You can actually skip this and head to the first tutorial right away.

Tutorial 1
How to install Minix and setup VMware Player

Tutorial 2
RSE and Minix commands

Tutorial 3
Setting up a project with some useful scripts

Tutorial 4
Adding graphics to a project

Tutorial 5
Adding keyboard input to a project

Tutorial 6
Adding a timer to a project

Tutorial 7
Adding a mouse to a project

Tutorial 8
Loading bmp images

Tutorial 9
Creating a state machine and a main menu

Tutorial 10
Creating the game state, adding a moving background and ground

Tutorial 11
Adding flappy and the mario pipes

Main menu screenshot

Read more »

Get Apache, MySQL, PHP and phpMyAdmin working on OSX 10.9 Mavericks

Read more »

[Minix][Tutorial 4] Adding graphics to a project

In this tutorial we are actually going to start coding flappy-nix.

Important note

My goal with these tutorials is to help you and guide you through the development of a project and to give you advice and tips for the LCOM course. These guides ARE NOT a way for you to just easily skip the course. Therefore, I will demonstrate how to develop this project from scratch but I will not show you how to code the stuff you are supposed to do in class. Things like developing basic functions to write to the video memory, handle the timer, handle mouse clicks and keyboard presses are expected from you, and I will make use of these abstractions without showing you their source code.

Adding graphics

The first thing we are going to do is to add some graphics to our program! I will take into account that you already have developed your own graphics library during class.

You should have two files. I named mine Graphics.c and Graphics.h. As you might know, the .h file is where the functions are declared, where as in the .c the functions are actually defined.

You should have implemented the VESA BIOS Extensions during class as well. I implemented them in VBE.c and VBE.h.
You should also have a file named LmLib.h, which is provided in the class handout.

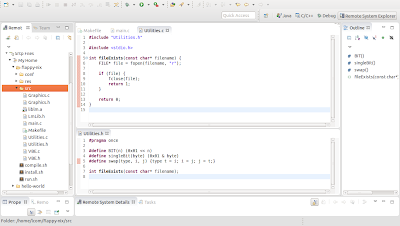
In addition to these, in every project I work, I usually define a Utilities.c and Utilities.h where I define some useful functions. Below is a screenshot of my Utilities current state, where is also visible the current content of the src folder. You should have all these files in there by now.


In this case, as you can see, I only defined three macros and a function to verify a file's existence. Pay special attention to these macros: you will find them really handy throughout LCOM. If you don't know what a macro is or do not understand what these specific macros are for, I strongly advice you to do a research on google for yourself.

Update Makefile

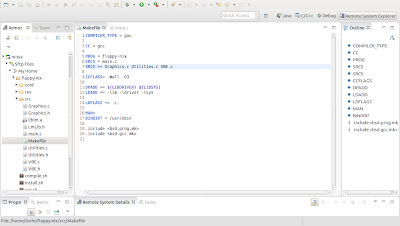
Do not forget to constantly update your Makefile: since we've added a lot of files to the src folder, you should declare the .c files after the SRCS label, otherwise the compiler will not know of their existence at compile time.

Below is my current Makefile. Notice that the new files have been declared at line 7.


Update main.c

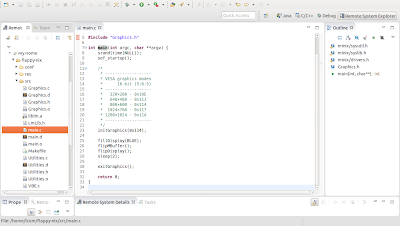
Now that we have everything set, let's update main.c to make the program fill the display with the color blue for two seconds and then terminate. Here is how my main.c looks like:


You might be asking: What are all those functions? Where is fillDisplay() defined? Where is BLUE defined?
These are all functions I have developed. You might have developed functions which do almost the same thing but have different names. I will now give you some advice about them.

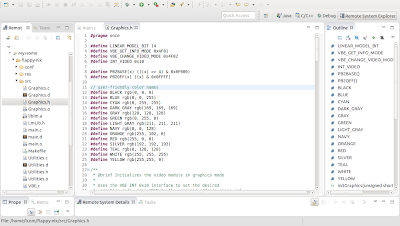
As you can see, I have color names! And they are VERY useful. I defined them in Graphics.h as preprocessor directives - look at the screenshot below. This is a nice way to easily access and pass colors to functions! It is a good idea for you to have them. You should notice though that they make use of the rgb() function, which you should implement.


The mouse buffer

I have also implemented two functions called flipMBuffer() and flipDisplay(). What are they used for? Well, it is something similar to a triple-buffer: I have three buffers: videoMem, mBuffer and buffer - flipMBuffer stands for flip mouse buffer and mBuffer stands for mouse buffer.

Here is how all it works: every graphics function I have defined writes to the buffer. So, say I call drawRectangle(), the function will modify the buffer. Everything except for the mouse is written there: when I call drawMouse(), that function copies the buffer to mBuffer and only then draws the mouse cursor directly in mBuffer. This enables me to update the mouse more frequently, because in order to draw the mouse cursor, I do not need to redraw every polygon of the entire scene, as long as the objects in the scene have not changed! I just copy the buffer to mBuffer again and draw the mouse cursor directly there. Do you get it? This way we can update the mouse more frequently and as a consequence, the mouse cursor movement will look much more fluid. After that, whenever I want to update the display with what has been written to the mBuffer, I just need to call flipDisplay(), which will copy the mBuffer to the video memory - the screen buffer, where we actually see the graphics.

Below is a draft with the logic behind all this.


Testing the program so far

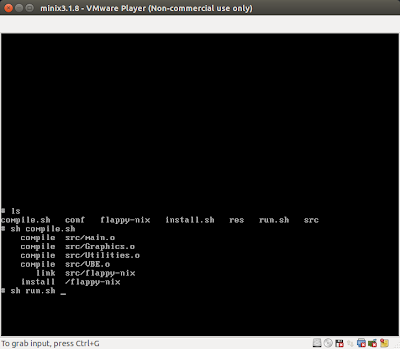
To test the program, go to minix, browse to the project folder, compile the program and run it. There is no need to run sh install.sh again because we've already run it once; it is only necessary to run it again when we make changes to the res folder.


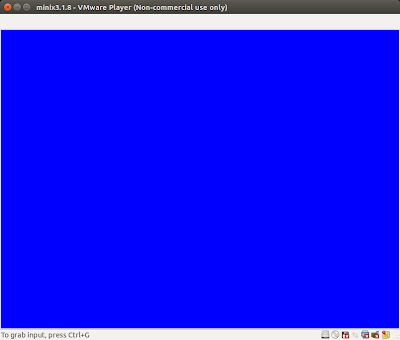
And this should be the result: a blue screen lasting two seconds.


Back to index

Click here to go back to the index post.
Read more »

[Minix][Tutorial 2] RSE and Minix commands

In this tutorial I will teach you how to link Eclipse with Minix through RSE and the infamous Hello world program.

RSE, also known as Remote System Explorer, is a plug-in for eclipse which will be essential to develop Minix applications.

First of all, open Eclipse and boot Minix.
Log in minix. If you did not catch this in the previous tutorial, both the username and password are lcom.


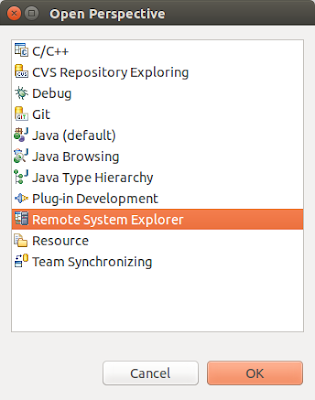
In eclipse, open the Remote System Explorer perspective.
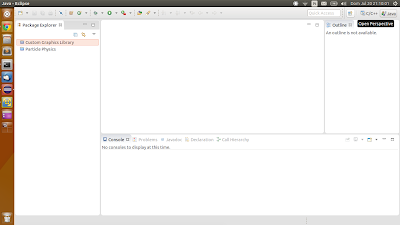


If RSE is not on the list, you will need to install it:
  • go to Help > Install New Software;
  • paste the url of the repository of your eclipse version. In my case it is:
    http://download.eclipse.org/releases/luna/
  • type "remote" in the filter
  • select Remote System Explorer End-User Runtime
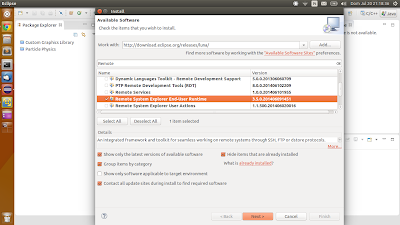
  • click next, I agree and finish

We now have the RSE perspective up and running, but we still have to configure the connection to Minix.

Click the button to add a new connection:


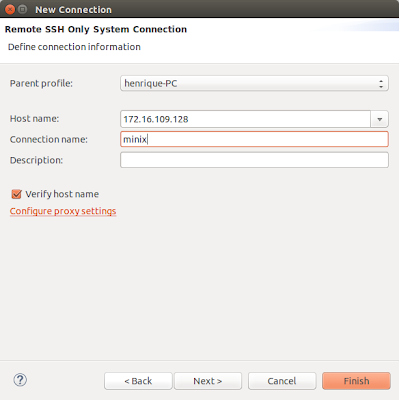
Select SSH Only and press Next.
Now you need to get the ip of your virtual machine. Just check it out in VMware:
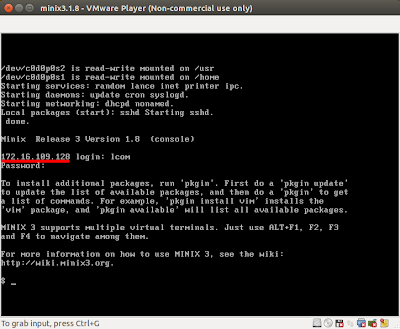


Type that ip into the Host Name box, name the connection as minix and press Finish.


The minix connection should now appear on the list of Remote Systems:
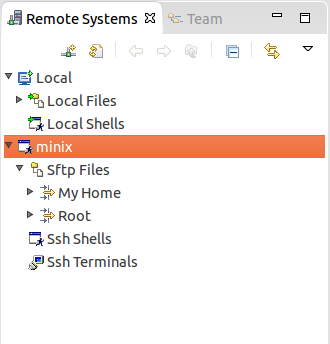


If you try to open My Home, you will be prompted to enter a password. Again, use lcom for both User ID and Password and press OK:
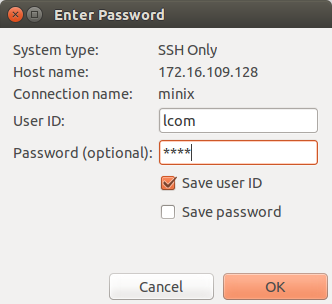


Since it is the first time we are opening the connection, some messages will pop up...
Just press Yes, Yes, Yes and Ok.


Now that we have everything set, let's create our first program via RSE!
Right-click My Home > New > Folder and name it hello-world.
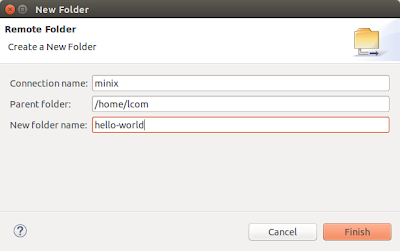


Right-click hello-world > New > File and name it main.c.
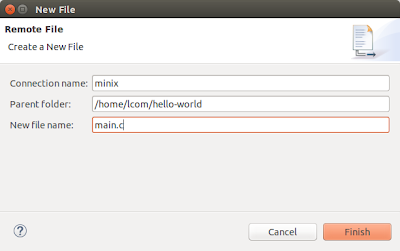


You should end up with:
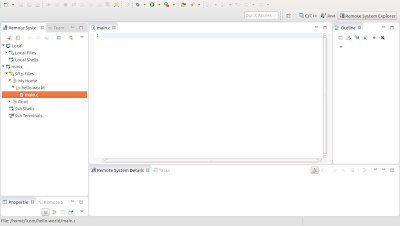


So, what we've done so far was to create a folder and a file inside it using RSE. Let's switch to VMware and see if the folder is really there.

Right after logging in, type ls and press Enter. This command lists the content of the current folder we're in. If you did everything correctly so far, there should be a folder called hello-world!
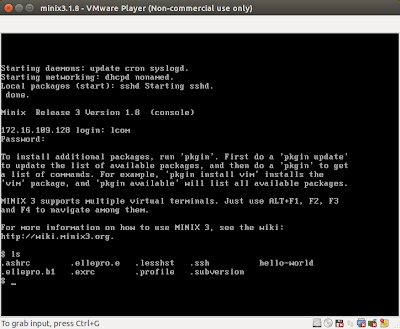


Now, let's navigate to hello-world and check it's content.
To navigate to another folder, use the command cd destiny-folder. So in our case, just type: cd hello-world. If you now list the current folder's content using ls, the result should look like this:
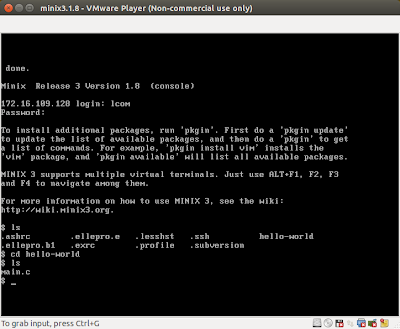


I really hope you are getting the hang of this and hopefully everything is making sense.

Let me teach you a little trick that is REALLY useful.
First, navigate to the folder that contains hello-world, in other words, go up in the folders tree using the command "cd ..".
Just to make sure we're where we wanted, type ls. The result should be:
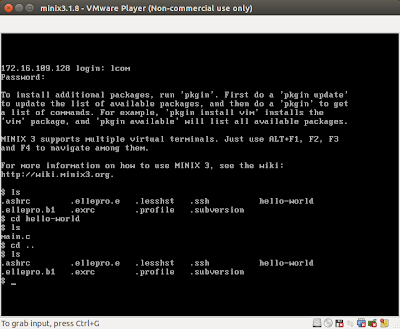


The trick I wanted to show you is the auto-completion. Trust me, it is VERY useful.
I want you to navigate to the hello-world folder again, remember the command? Yes, it is cd hello-world. BUT DON'T TYPE IT JUST YET! I want you to type cd h and afterwards to press Tab on your keyboard. Hopefully, after pressing tab, the command auto-completed to ch hello-world/.
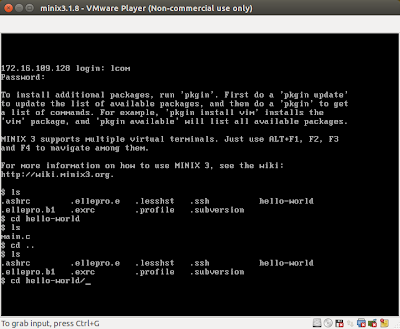


And that's it, try not to forget this and use it whenever you can, since it makes browsing through folders blazing fast and you will never misspell a folder again.
The auto-complete also works with files. You must notice though that when you have more than one folder starting with the same letter, the auto-complete will not work and you must provide an additional letter until the prefix on the command only matches to one folder.

Time to switch to Eclipse.

Open main.c and write a simple hello world program:
#include <stdio.h>

int main() {
printf("Hello cruel world!\n");

return 0;
}
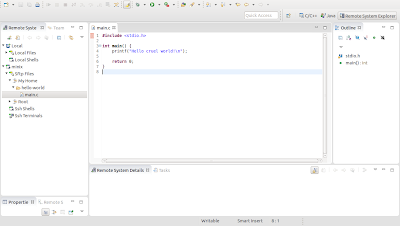

Save main.c and switch to Minix.

You can type the command clear to clear the minix console.
You should still be inside hello-world folder, so the output of ls should currently only be main.c.

We now want to compile main.c to create an executable file.
The command goes like: gcc -Wall main.c -o hello

The output of ls should now consist of two files: main.c and hello, the latter being the result of the compilation of main.c.
Well, what are we waiting for?! Let's run it! Type: ./hello and the result should look like this:
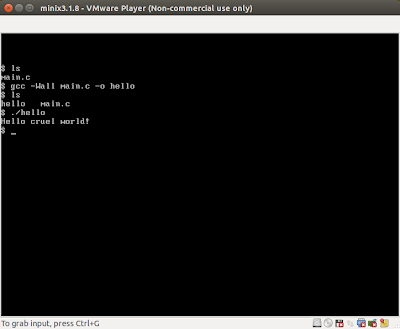


And there is the expected output: Hello cruel world!

I guess this is enough for one tutorial!
Let's just turn off the virtual machine and review this tutorial's commands.

To turn off minix, type shutdown. Wait for it to work, and then type off.
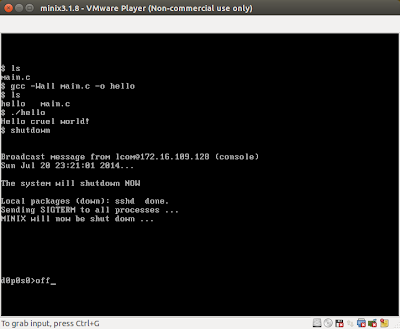


Minix should have turned off as well as VMware.

Commands used on this tutorial:

ls
lists the content of the current folder

cd destiny-folder
navigates to the specified folder

cd ..
navigates up (in other words, to the folder containing the current folder)

clear
clears the console

gcc -Wall file.c -o result
compiles file.c to an executable named result
-Wall is a compile flag that activates the output of all the existing warnings on our program during compilation. For LCOM evaluation purposes, this flag must be active and no errors/warnings are admitted on the compilation output.

./executable-file
runs executable-file

shutdown
turns off minix

off
completely turns off minix and closes VMware

Back to index

Click here to go back to the index post.
Read more »

Occuper inutilement votre bande passante pour tester vos équipements

Un de mes responsables de tests favoris me demandait comment réaliser une occupation de bande passante pour ses tests CPL et IAD (des box aussi appelées Gateways). Il travaille essentiellement sur Windows.

Ma solution est assez simple et peut vous être utile. Il suffit d'installer wget et de déposer sur l'IAD un fichier bien volumineux. La plupart des IAD du marché sont équipées d'un DMS : un serveur de médias de type UPnP A/V & DLNA. Ces petites bêtes sont alors visibles tels de simple serveur HTTP.

Il faut alors repérer l'URL du fichier déposer. Je vous conseille l'excellente suite d'outils UPnP Tools pour y arriver. Vous avez l'adresse ! Alors, rendez-vous à la dernière étape, elle consiste à utiliser un fichier BATCH (old school mais très simple) de façon à requérir le fameux fichier indéfiniment. C'est sur cette requête que vous appliquer l'occupation souhaitée de bande passante.

Voici le petit script bandwidth_alloc.bat :

:start
wget -r --limit-rate=30k http//url_sur_l_iad/grosfichier.mkv -o wgetlog
goto start
Dans ce script, la limitation est placée à 30ko.
Read more »

[Minix][Tutorial 6] Adding a timer to a project

In this tutorial we will be adding a timer implementation to our project and making a rectangle move across the screen.

Adding the timer

Go ahead and add the timer implementation you have developed during class as well as i8254.h to the src folder. Do not forget to declare it in the Makefile.


Now we need to declare that FlappyNix has a timer. I have added lines 3, 7 and 11 to FlappyNix.h:


We will have to modify the methods of FlappyNix.

To start, I have added line 8: a const int represnting the mouse update FPS multiplier. What is that? It is an integer that multiplied by the FPS will determine the refresh rate of the mouse. Since FPS = 25 and mouseFPSmult = 3, the mouse position will be tracked at 25 * 3 = 75 FPS.
Regarding the start function, I have added lines 15, 18 and 23, which are responsible for subscribing timer interruptions, resetting the timer frequency and creating a new timer, respectively.


Regarding the update function, I have added line 32, which at every update, before registering any interruption, resets the timer tick flag.


Afterwards, from line 44 to 46, I check for a timer interruption and if there is one, I activate the timer->ticked flag and increment the timer counter - yes, that is exactly what the timerHandler() function does:
void timerHandler(Timer* timer) {
timer->counter++;
timer->ticked = 1;
}
I have also added lines 58 to 67. Line 60 is where the mouse draw function call will be placed when we implement the mouse - 75 FPS. Inside this block, there is another block (lines 62 to 66) which is executed at 25 FPS. This block is where we are going to update our moving rectangle, but we will get there... Let's focus on planning the program's structure first.

Moving on, I have not modified the draw function. I did modify the stop function though: I have added a call to unsubscribe the timer and to delete it afterwards, as you can see below.


Now is a good time to confirm the program is still able to run without any problems. Compile and run it. So far, although we have added a couple of lines, the program should do exactly the same: show a blue screen and terminate when the Esc key is pressed.

Is it still working? Good! Let's move on.

Making a rectangle move

Let's do some interesting stuff: draw a rectangle and make it move horizontally to the right. In order to do this, we will need a variable to save the location of the rectangle - line 13.


Now we need to initialize this variable! Let's make the rectangle start at x = 10 (line 21).


Let's edit the update function and make the x location of the rectangle increment every time - line 67.


Finally, let's draw a rectangle that starts at flappy->tempRecX with constant width and height of 200 pixels - line 77.


Side note: my drawFilledRectangle() function might be different from yours. If you don't understand mine, here is a quick explanation: it receives five arguments - the first two arguments are the x and y coordinates of the top left corner of the rectangle; the second two arguments are the x and y coordinates of the bottom right corner of the rectangle; the last argument is the color of the rectangle.

And that is it! Compile and run your program and you should see a rectangle moving to the right at constant speed! You should still be able to exit the program by pressing the Esc key on the keyboard. Pretty nice, right?


Back to index

Click here to go back to the index post.
Read more »